Bushcraft Shelters
The Infinite Versatility of the 10 × 10 Tarp
A single 10' x 10' tarp is one of the most versatile pieces of gear you can carry. Depending on how you rig it, the same tarp can shade a patrol at lunch, block a cold wind at your back, or become a fully enclosed tent you sleep in overnight. The difference isn't the tarp; it's how you use your ridge line, guy lines, and stakes.
There are dozens of different configurations. Here are five to get you started.
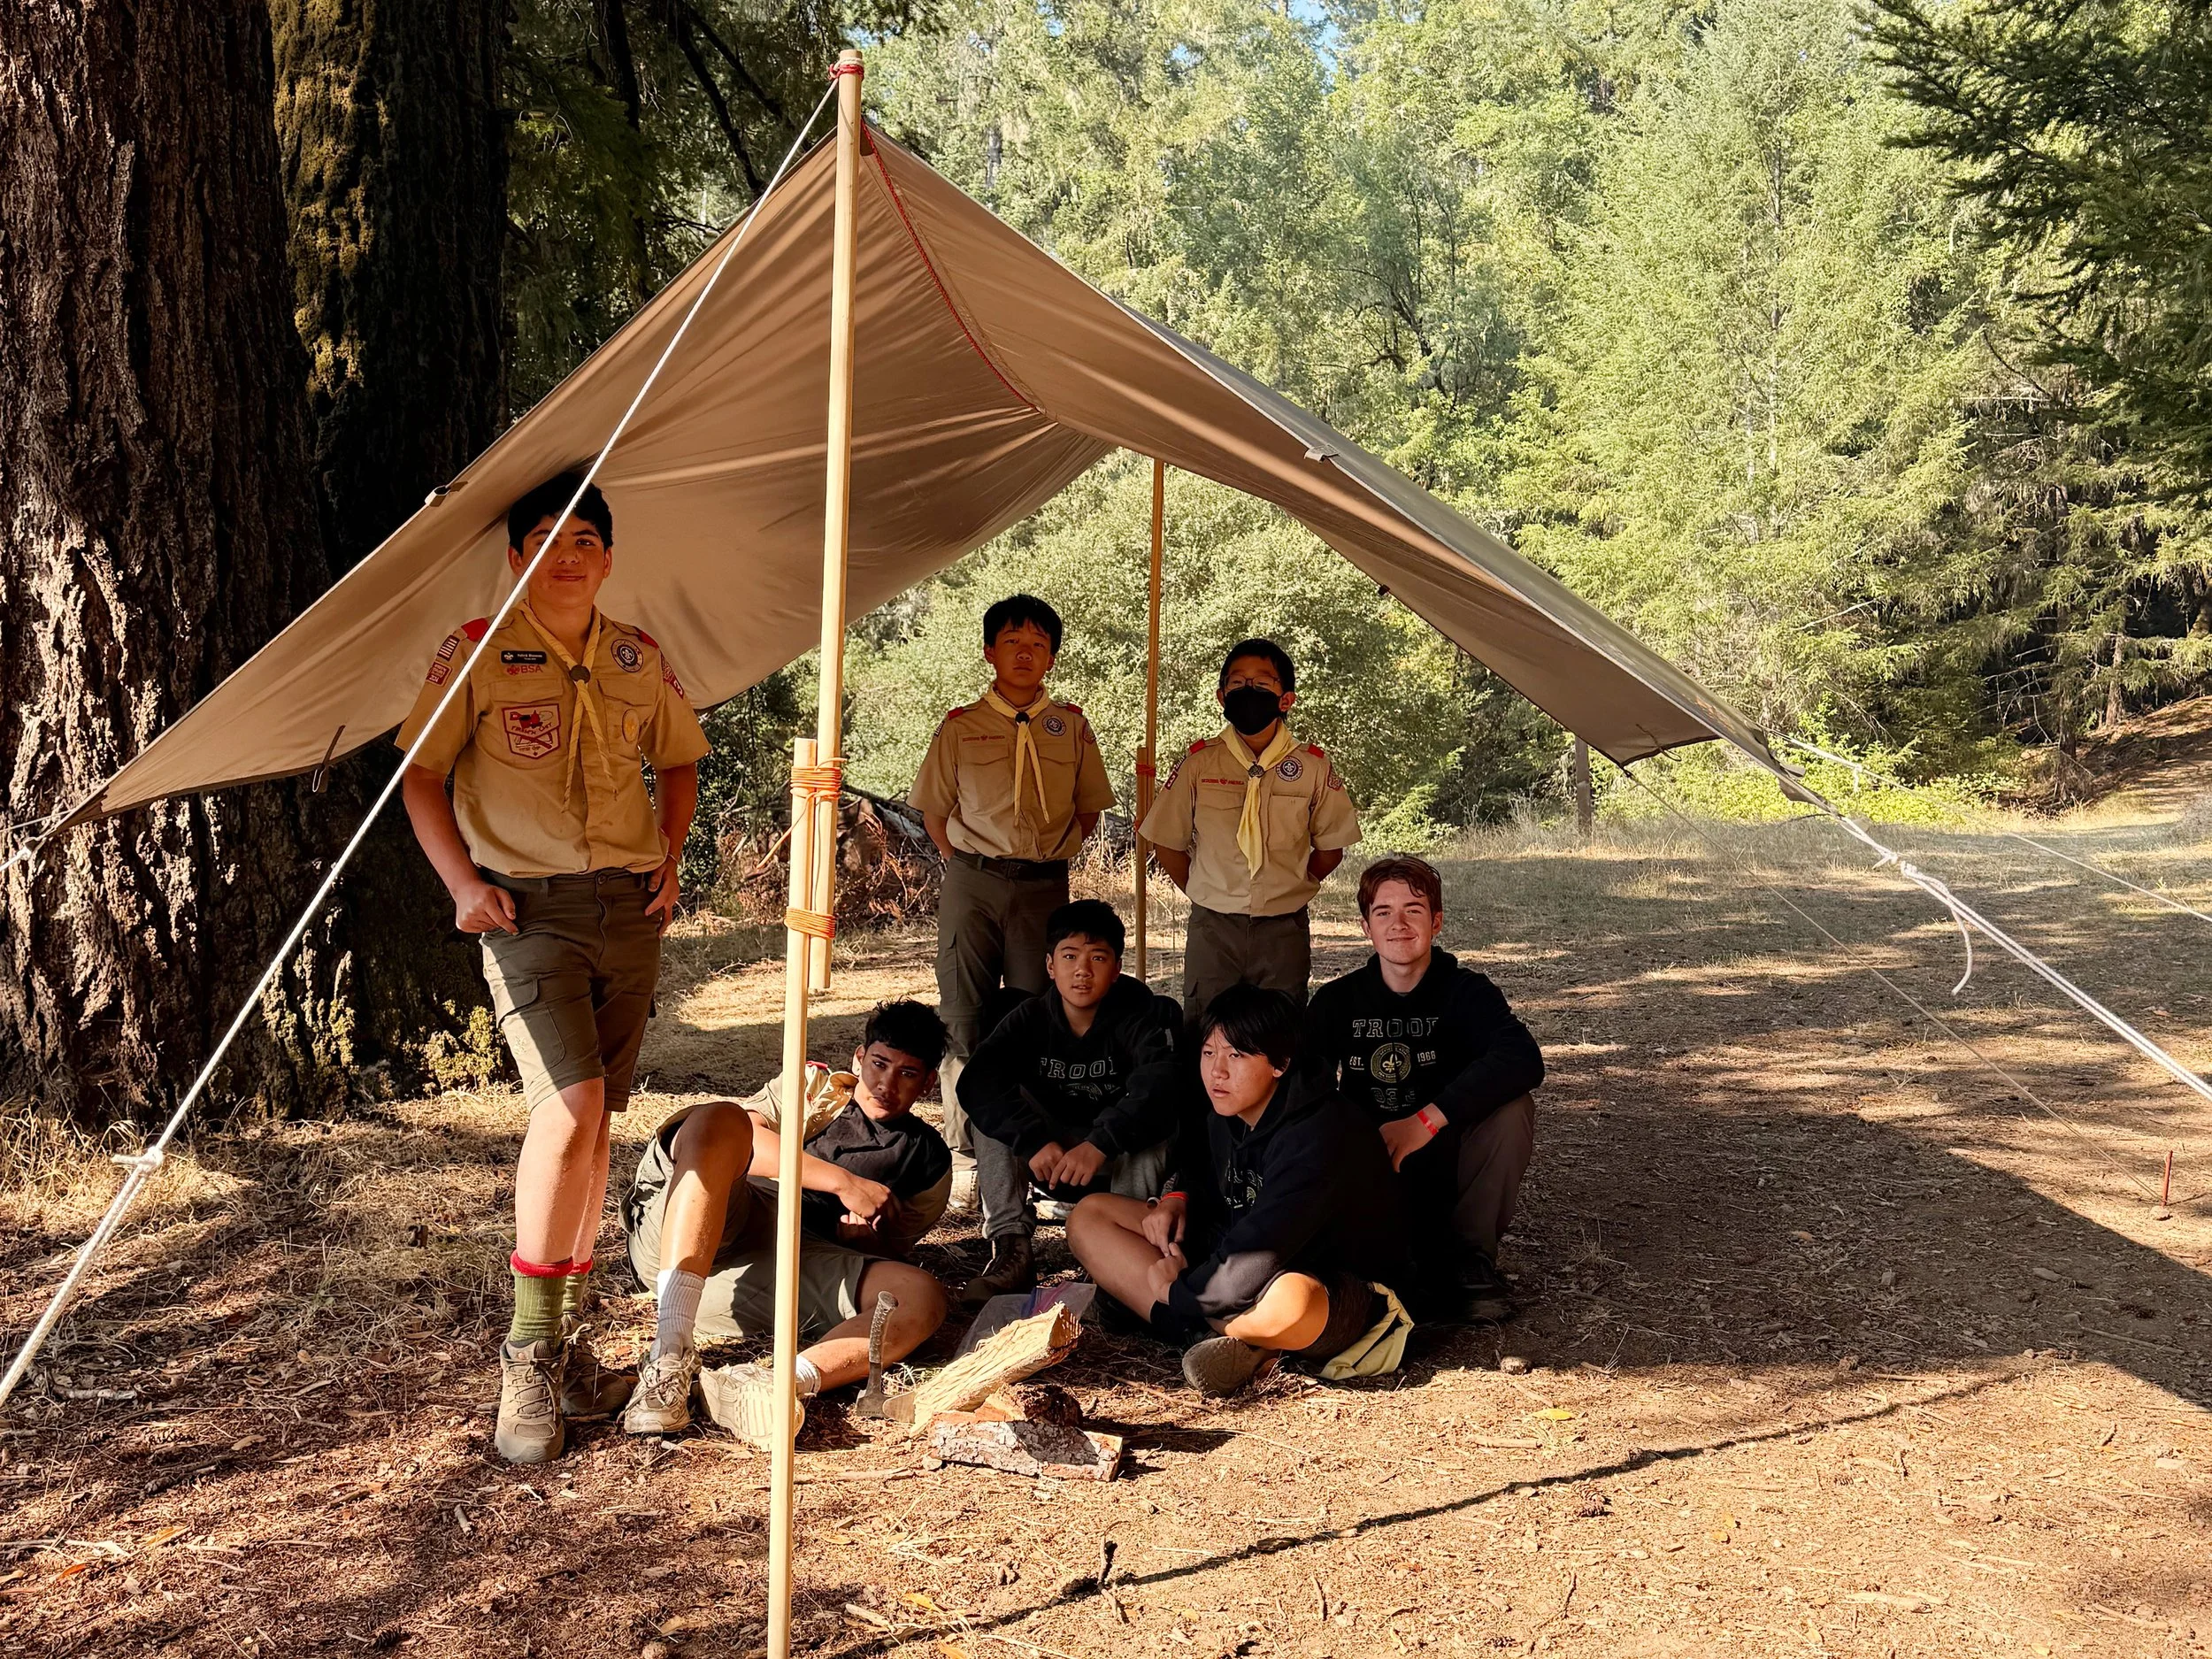
1. Patrol Dining Fly
On campouts, this should be the first thing you put up and the last thing you take down. The simplest version is constructed from a 10 × 10 tarp, two poles (or four staves lashed together in pairs), 6 stakes with guy lines, and a ridge line. Alternatively, you can add poles at each corner for a taller, flatter structure.
How to pitch it: All four corners are pulled up and out to four separate anchor points (trees, poles, or stakes) so the tarp forms a flat or gently sloped canopy above head height. The peak is at the centerline of the tarp and is created by stringing a ridge line between two upright poles, Guy lines from each pole are staked out to keep the poles upright and the ridge line taut.
Best for: Shade and rain cover over a cooking or eating area. This is the pitch you'll use most at a patrol campsite. It keeps a whole crew dry while everyone can still move freely in and out.
Shelters: 4–8 people standing or seated underneath.
Materials: 10 × 10 tarp, 4 guy lines (one per corner), 4 anchor points at varying heights to create a slight pitch for rain runoff — don't pitch it perfectly flat, or water will pool.
Knots & lashings: Taut-line hitch, bowline, clove hitch, round turn with two half hitches, round lashing.
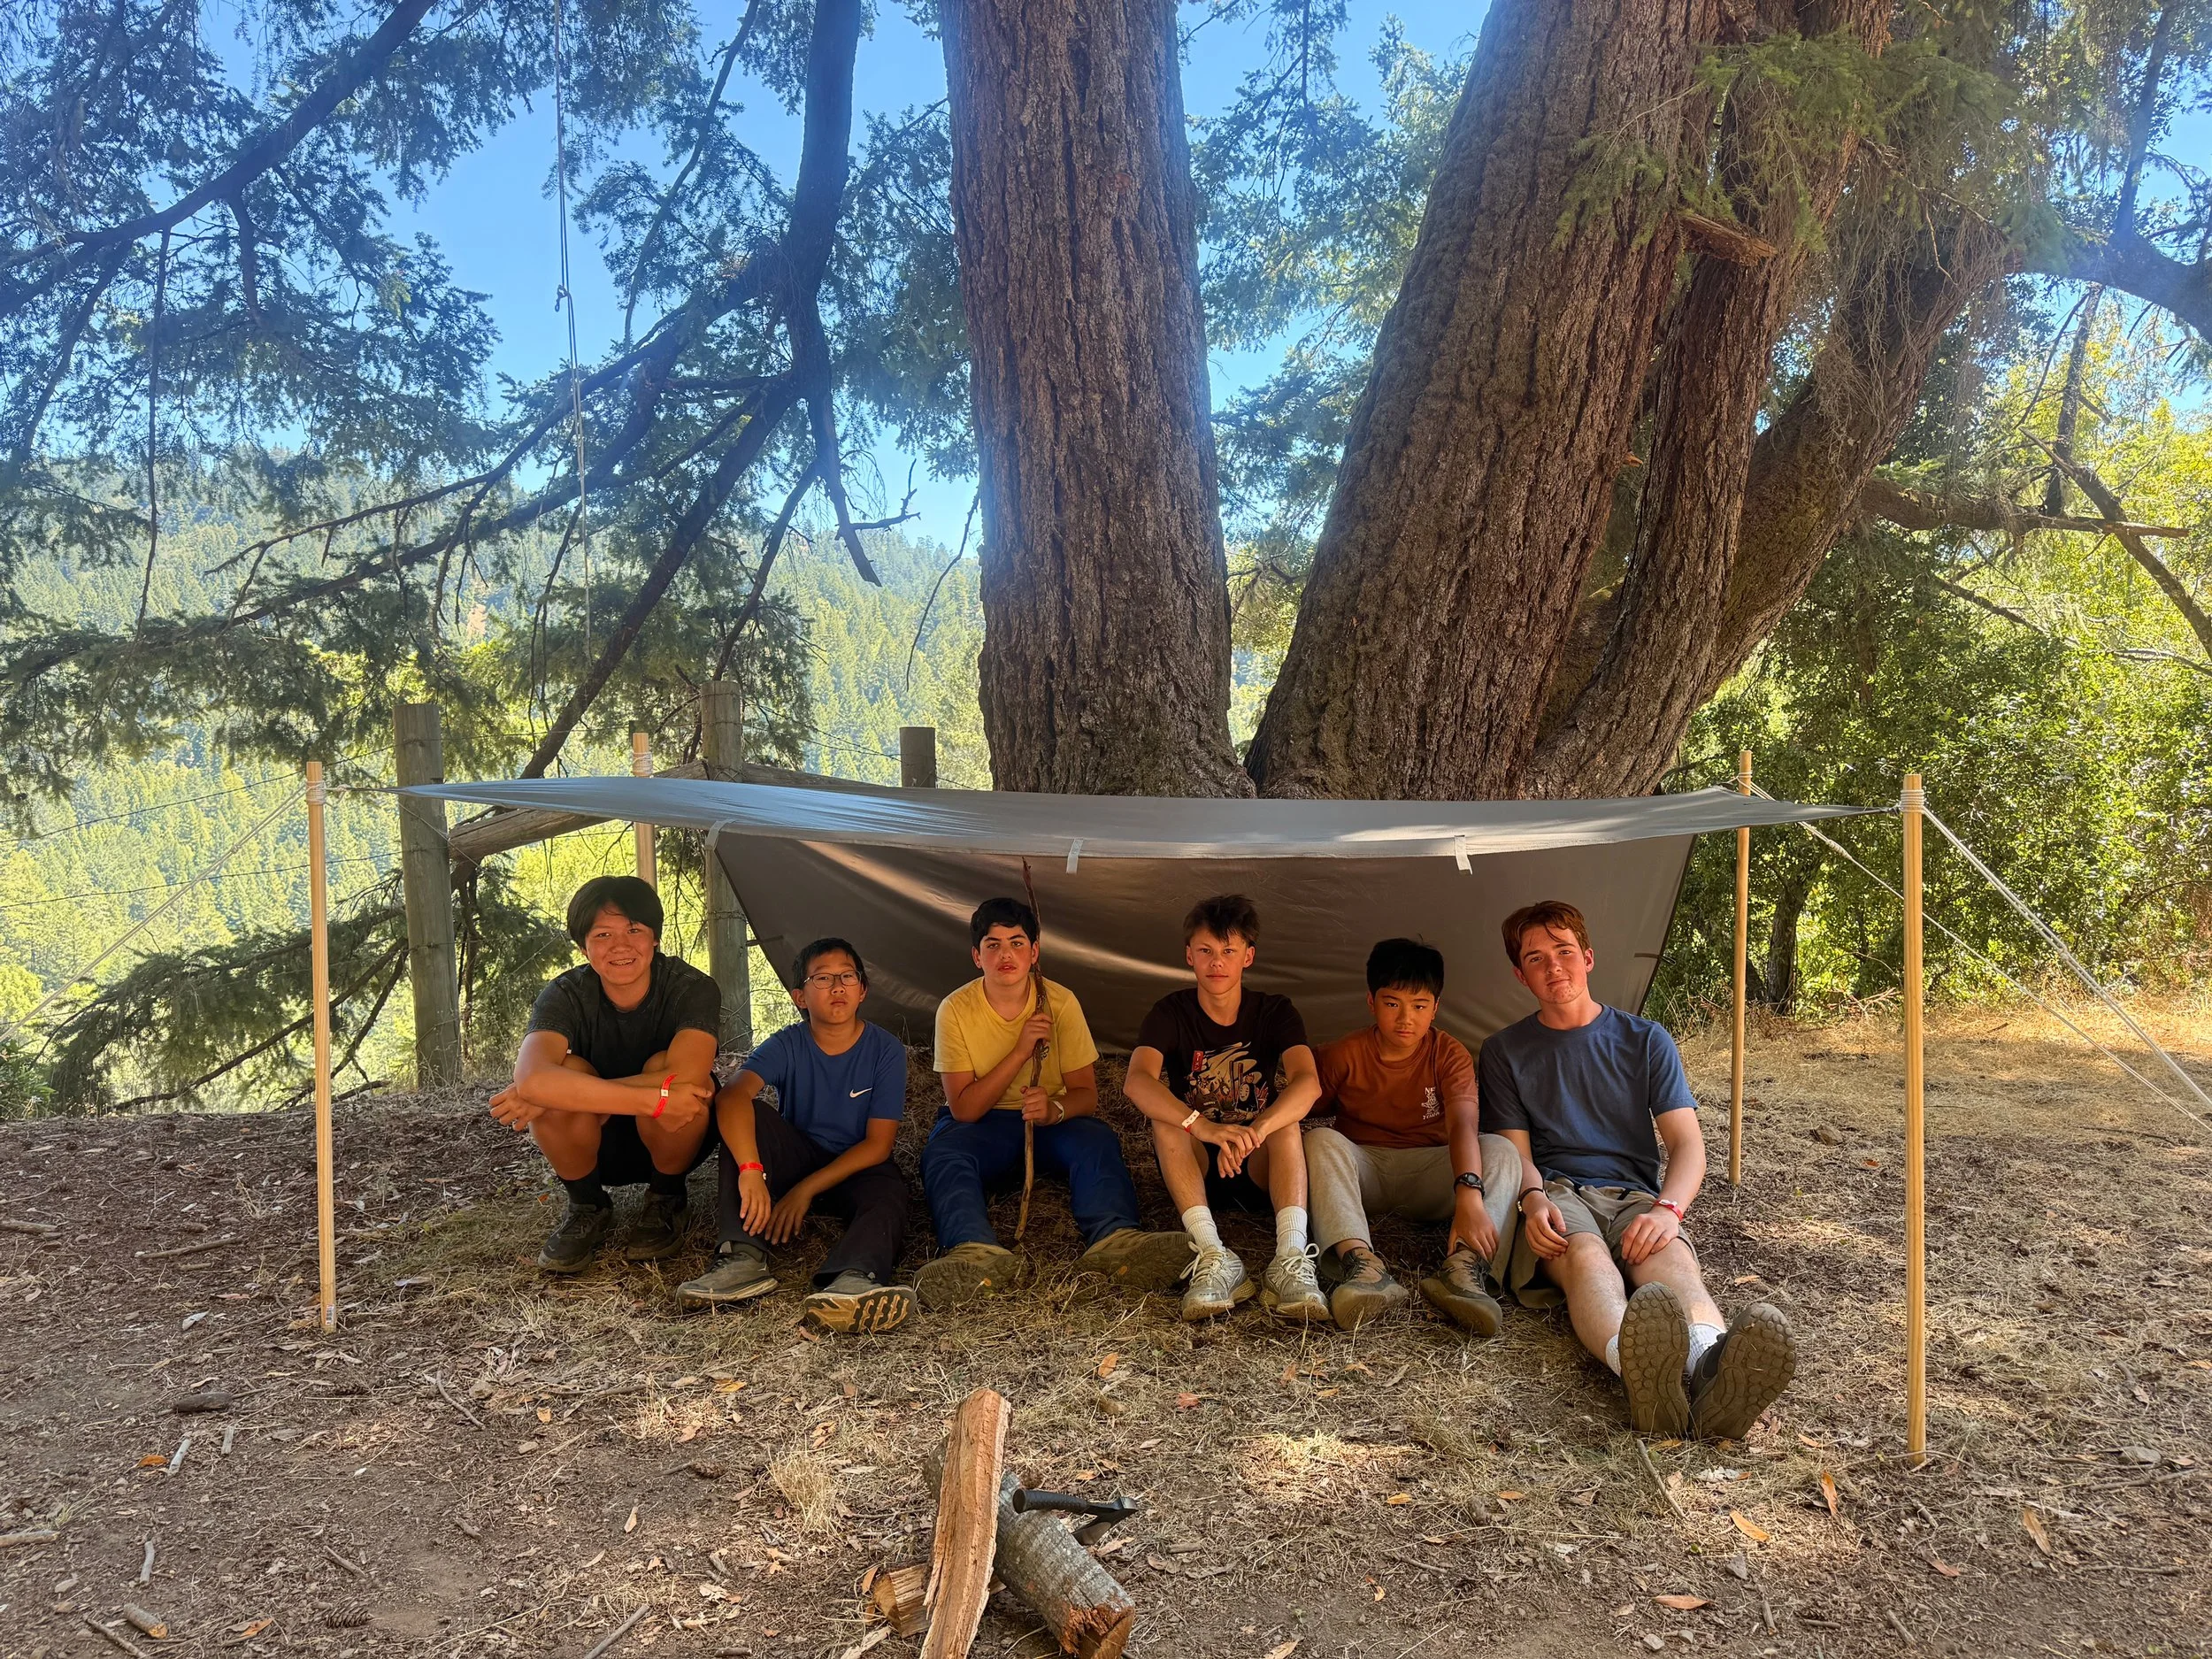
2. Lean-To with a Ridge Line
A lean-to is the most basic shelter. With a tarp, it simply requires a ridge line or ridge pole. It’s also the basis for most debris hut shelters (i.e., a ridge pole against which you then lean sticks at an angle). Lean-tos can be the full 10’ tarp on an angle (one edge staked to the ground, the other secured to the ridge line) or they can cross over the ridge line to add additional overhead protection.
How to pitch it: Run a ridge line between two trees or staves. If using staves, you’ll need taut guy lines to keep them upright. Drape the tarp over the ridge line. Stake one edge down low to the ground at an angle, closing off one direction entirely. The higher the ridge line, the more headroom you’ll have; the lower the ridge line, the more ground coverage you’ll have. The version shown here is low and uses two additional staves to create an awning
Best for: Blocking wind and rain that's coming from one consistent direction. Pitched with the low edge facing the wind, it also reflects heat from a fire back toward you if you build one along the open side.
Shelters: 1–3 people lying parallel to the ridge line (tall version) or up to 6 people lying perpendicular to the ridge line (lower version, shown above)
Materials: 10 × 10 tarp, 1 ridge line, 2–4 stakes for the low edge, 2 trees or poles to hang the ridge line from. Extra poles for the low/awning version.
Knots & lashings: Taut-line hitch, round turn with two half hitches.
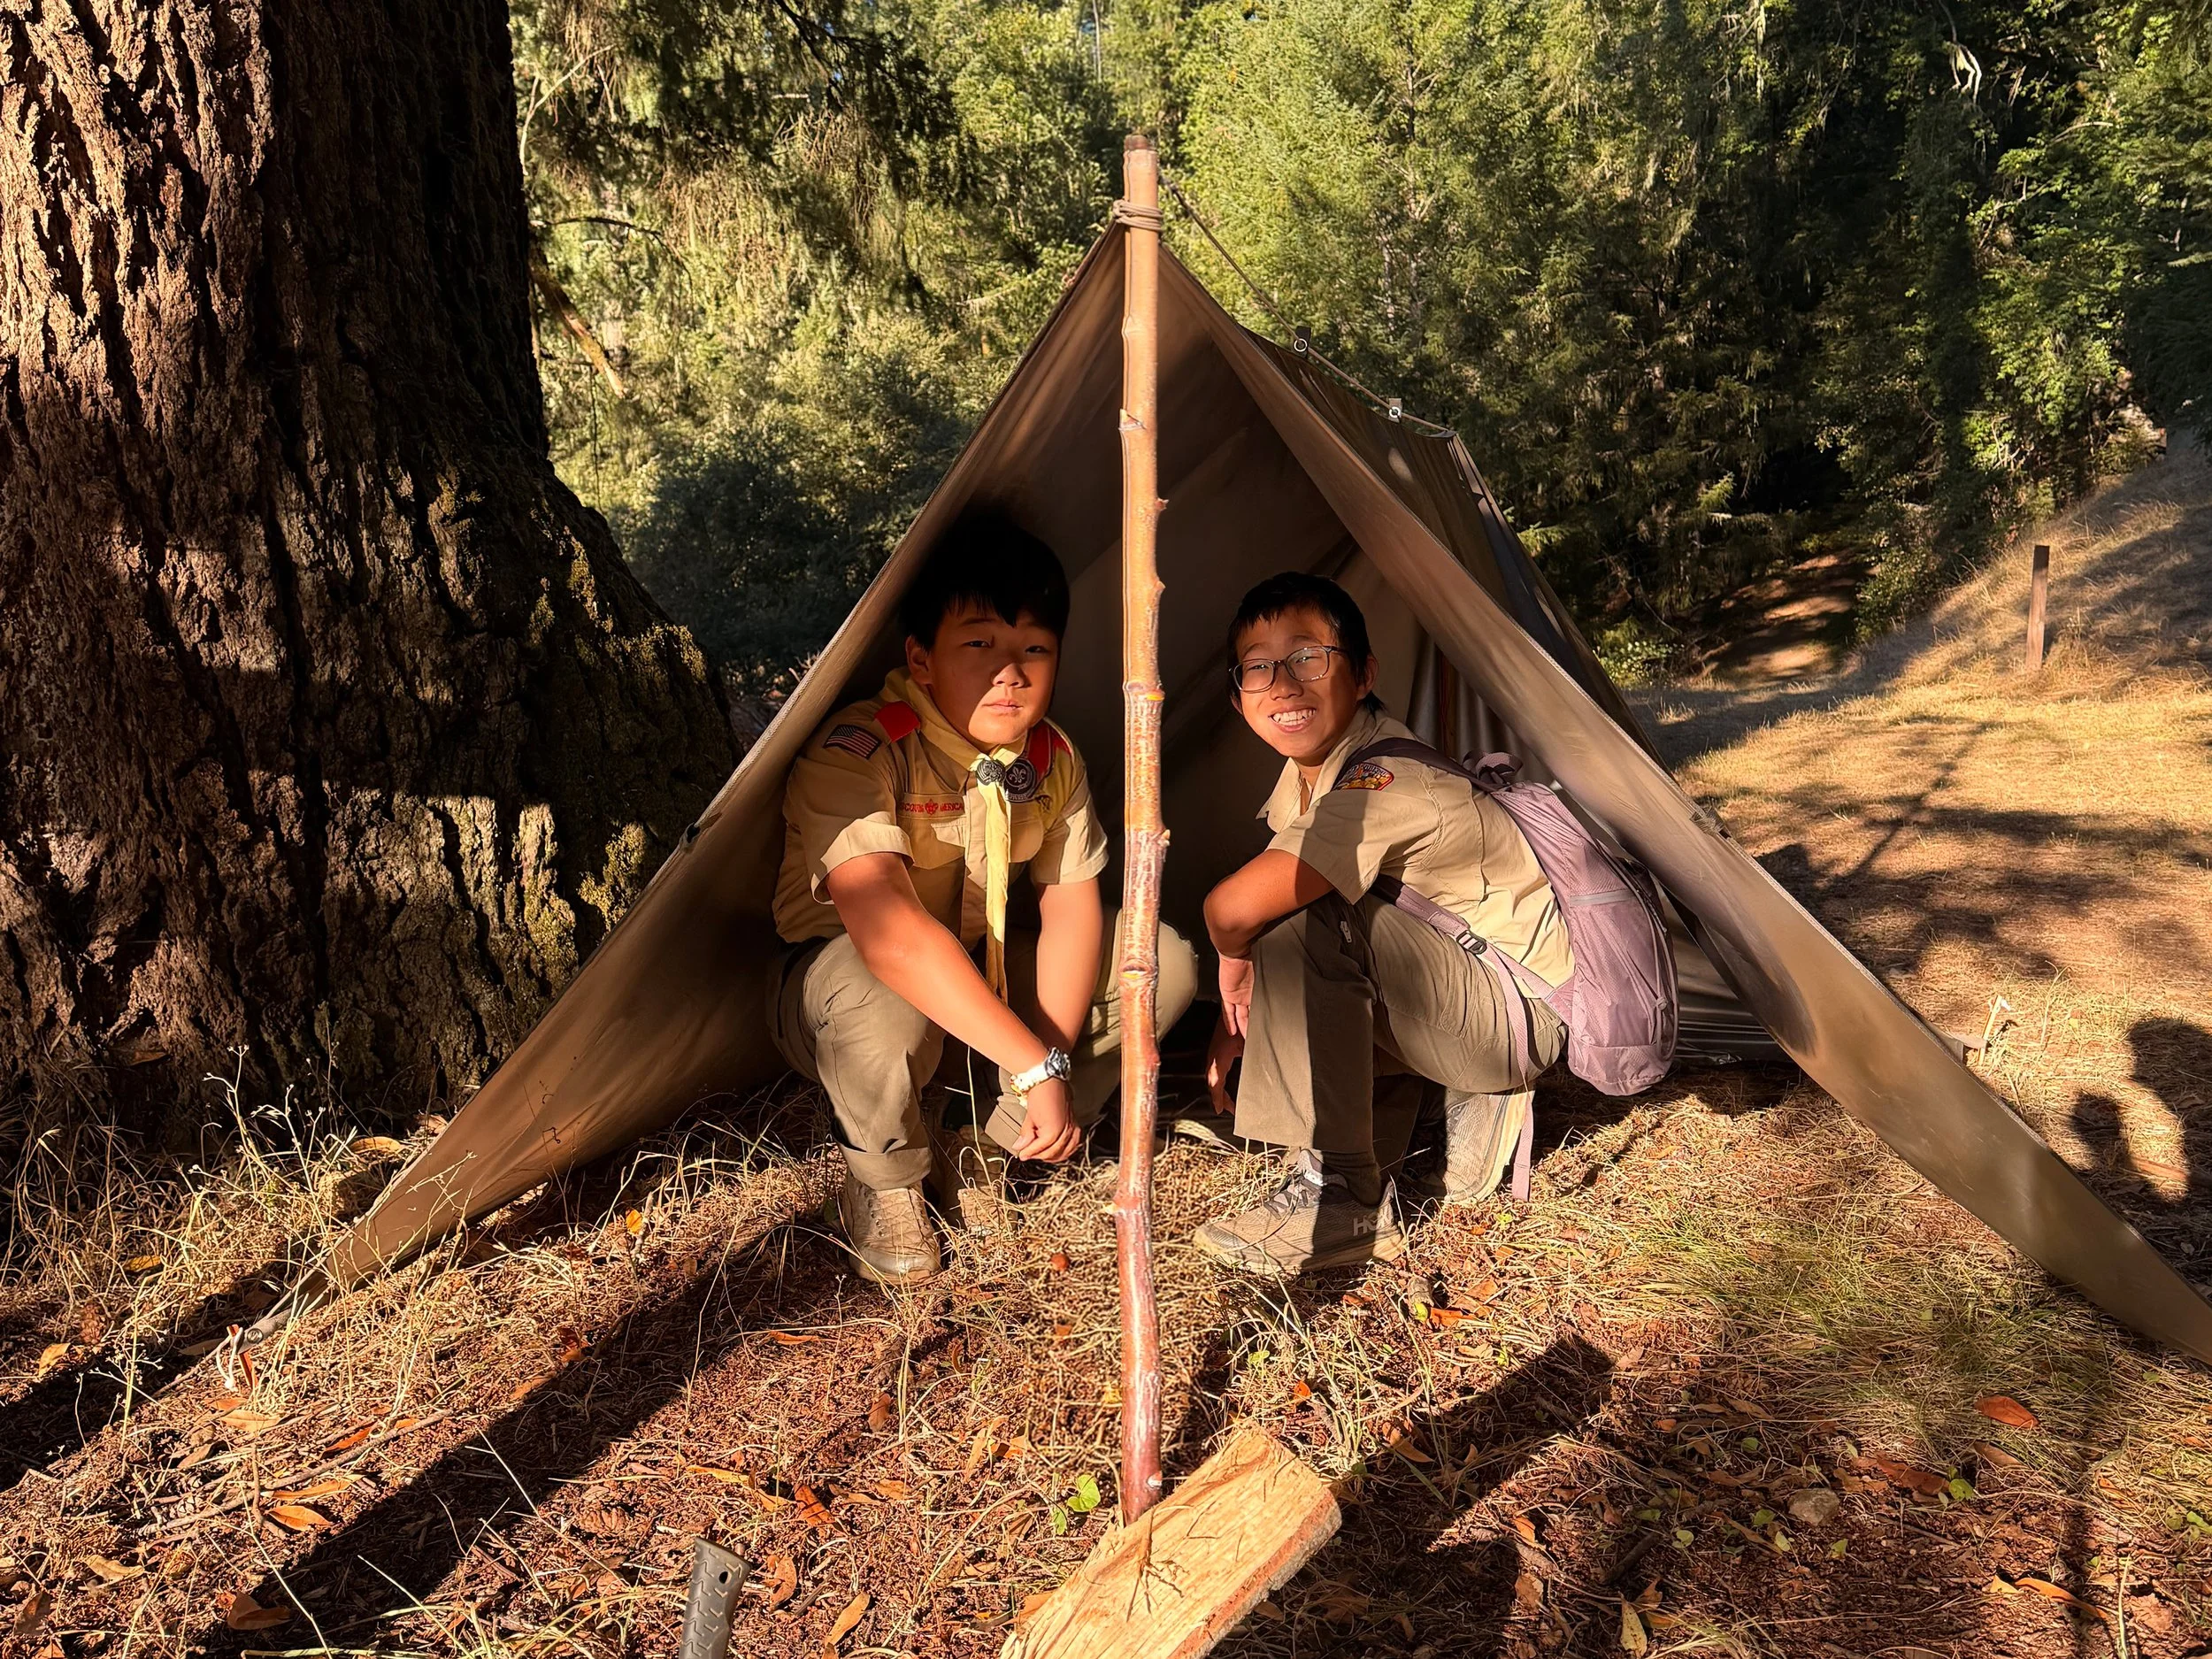
3. A-Frame, Enclosed on Three Sides
This cozy, one- or two-person shelter is a step up from the basic A-frame. It takes a little more work, but the reward is a shelter that protects you on three sides.
How to pitch it: Create a ridge line between two sticks, or staves. Note that you will need a tarp with centerline tie-outs for the setup. Hang the tarp from the center ridge line using all but the final tie-out so it slopes down evenly on both sides, like the letter ‘A.’ There will be some leftover material at the back where you skipped the last tie-out. Stake out both bottom edges. Close off the back triangular end by tying each of those loose overhanging corner to the opposite rear stake. Leave the front triangular end open as your entrance.
Best for: A step up from the lean-to or basic A-frame—better wind and rain protection because three full sides are enclosed, not just one.
Shelters: 1–2 people.
Materials: 10 × 10 tarp, 1 ridge line (rope or pole), 4 stakes for the base corners, cordage to close the back triangle, 2 guy lines off the ridge ends for stability. If you use staves for your uprights, you can secure a guy line to your front and back tie-outs, then wrap a quick clove hitch around your stave before staking it out to keep it taut. If you’re running your ridge line between two trees, you’ll need another short length of cordage to make a prusik hitch to keep your tarp taut along the ridge line.
Knots & lashings: Taut-line hitch, two half hitches.
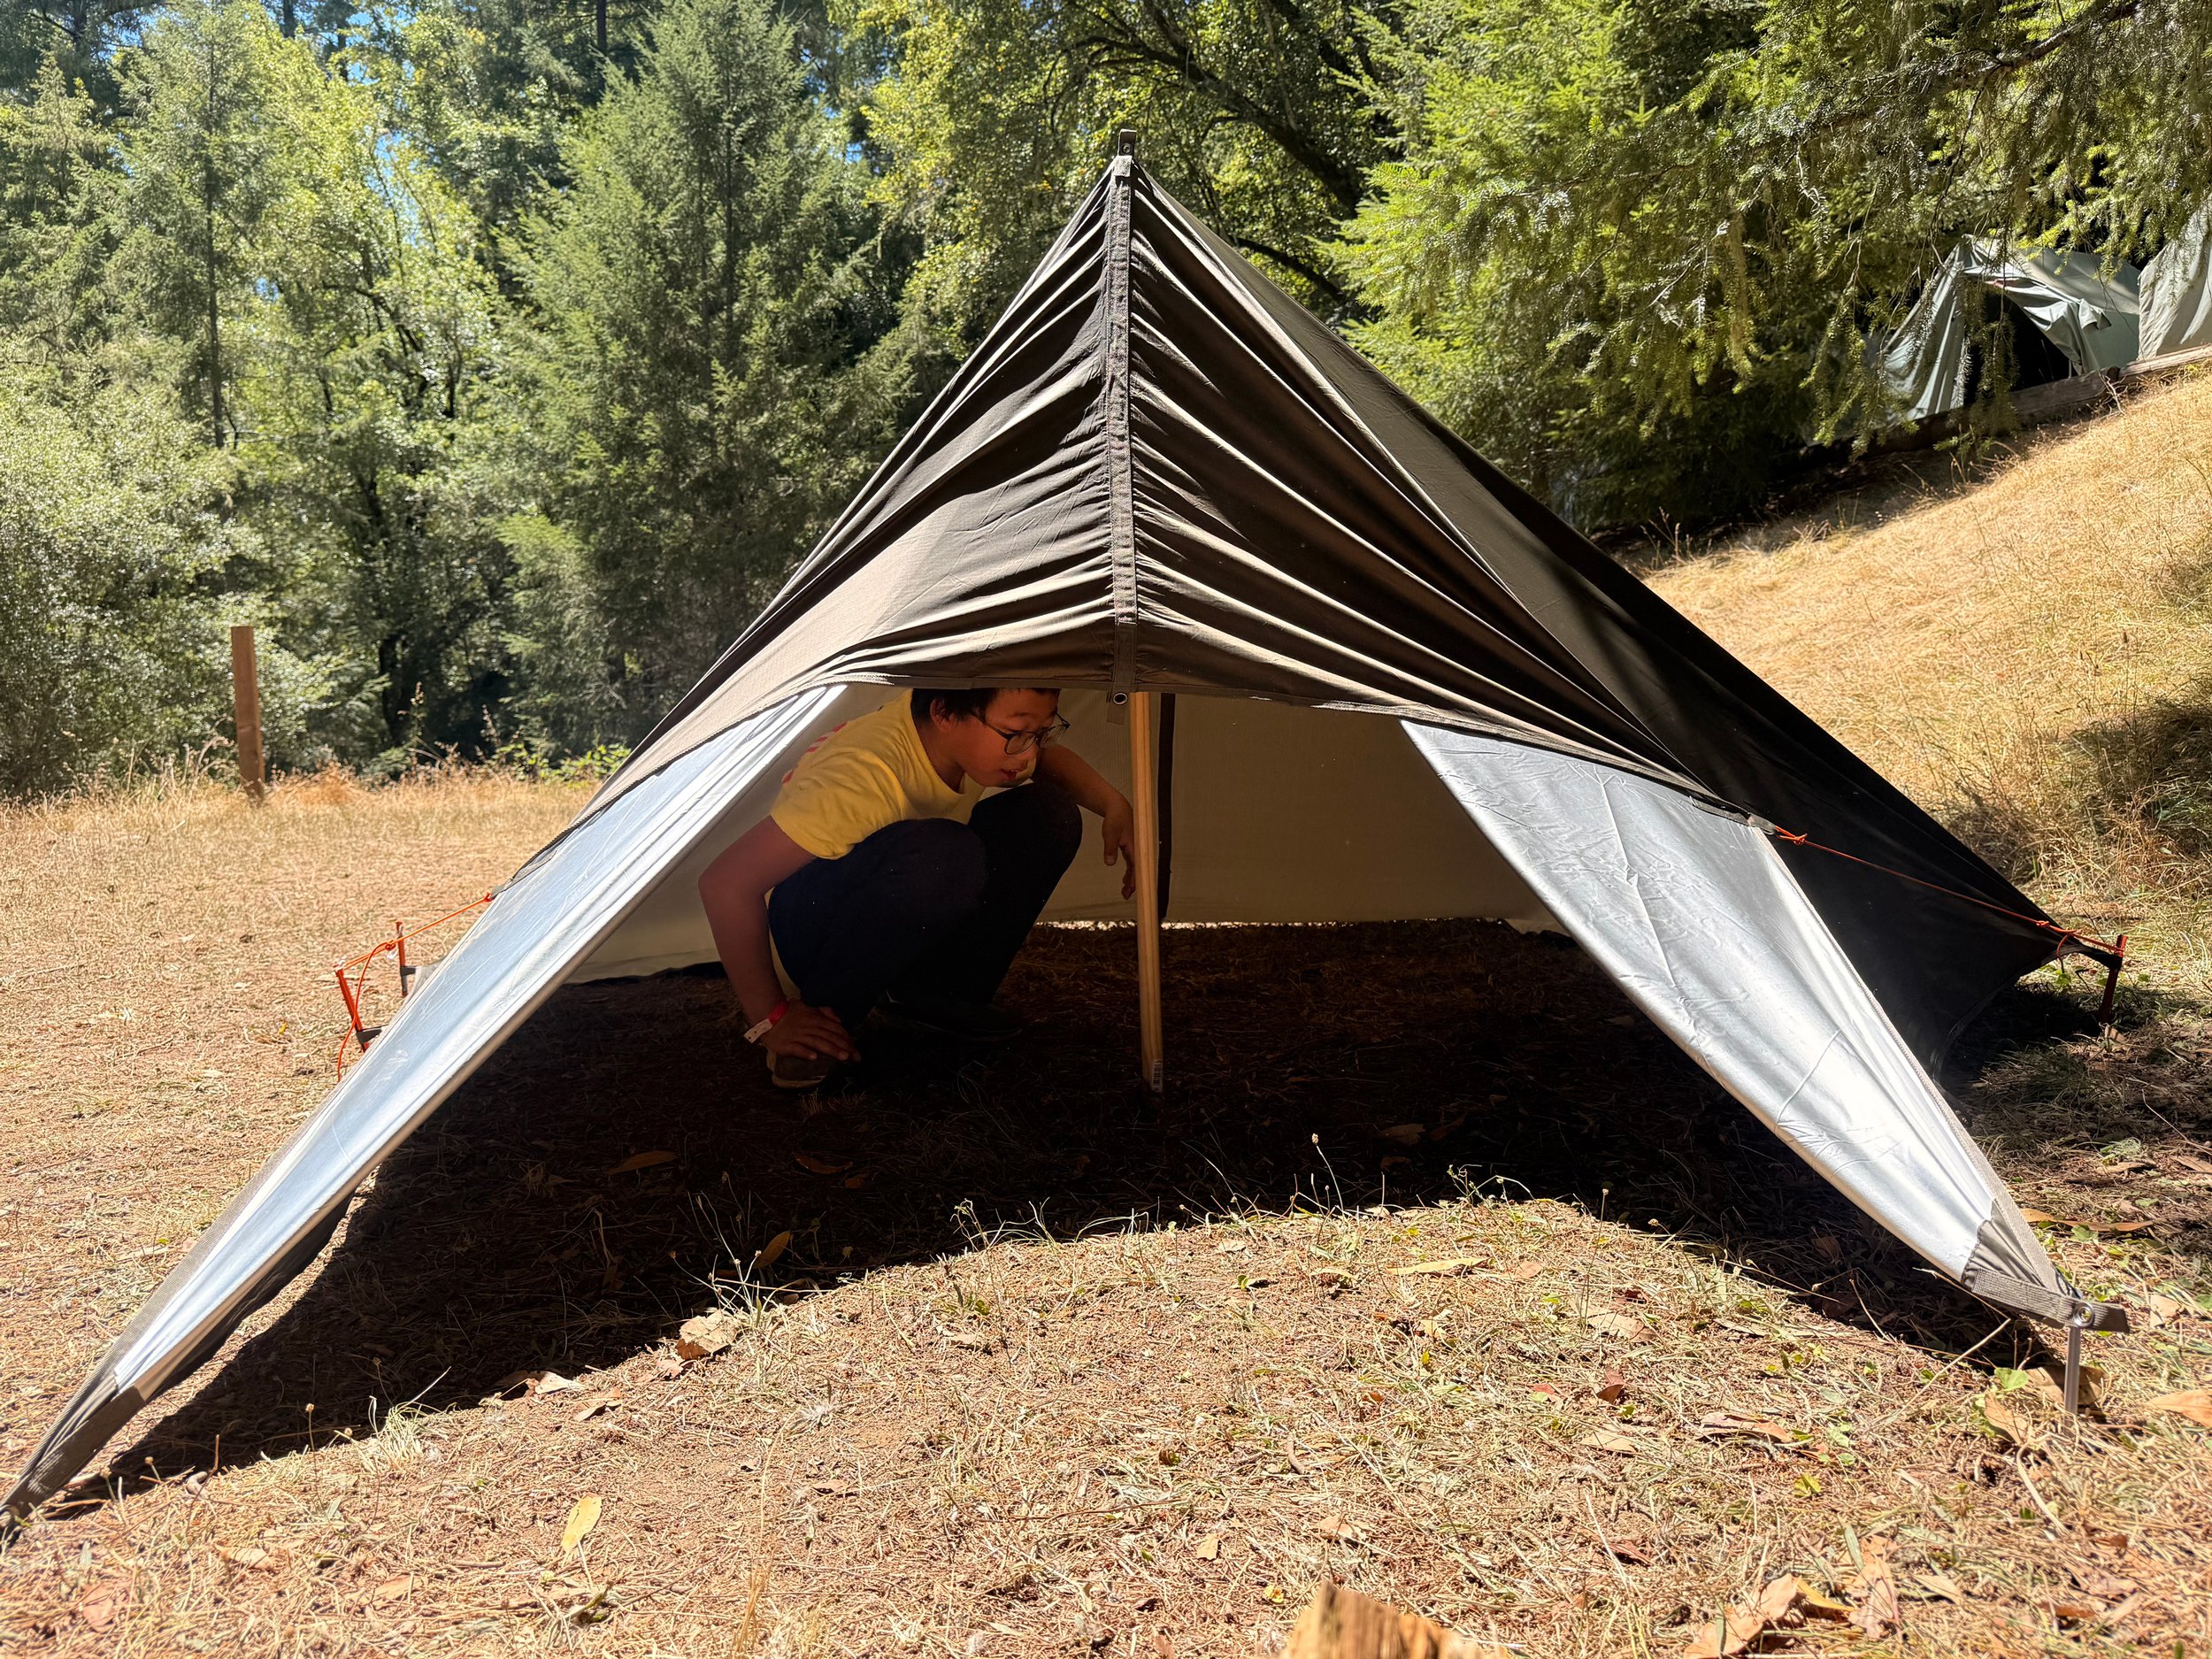
4. Three-Sided Pyramid Tarp Tent
How to pitch it: This one takes some practice, but once you know the steps, it’s easy. Lay your tarp so it is square on the ground. Decide which side will be the back. Stake down the tie-outs on either side of each back corner (leave the corners un-staked). Tuck the corners under the tarp. Now, move to the front left corner. Use a stick or pebble to mark the position of the first tie-out to the right of the left corner. Slide the left corner over to that spot and stake just the corner down. Do the same for the right-hand corner. Using a trekking pole, stave, or stick placed under the second tie-out point on the center line, raise the tarp. Be sure to cover the top of your center pole with a bandana, sock, or other padding to prevent puncturing the tarp. You’ll have some loose material hanging down in front. Fold it back, and tie the tie-outs to the rear stakes with guy lines.
Best for: Wind that shifts direction. Because of its geometry, this is an incredibly sturdy setup in windy conditions. It also looks really cool. It’s both spacious and warm, with room to sit up in the middle. It can even be set up without any cordage in a pinch. Your pack can act as additional protection at the entrance.
Shelters: 1–2 people.
Materials: 10 × 10 tarp, 1 center pole (or a tree with a low branch), 6 stakes for the closed corners, guy lines for the front entrance.
Knots & lashings: Potentially none! But a taut-line hitch and two half hitches or a bowline will make it extra sturdy and purdy.
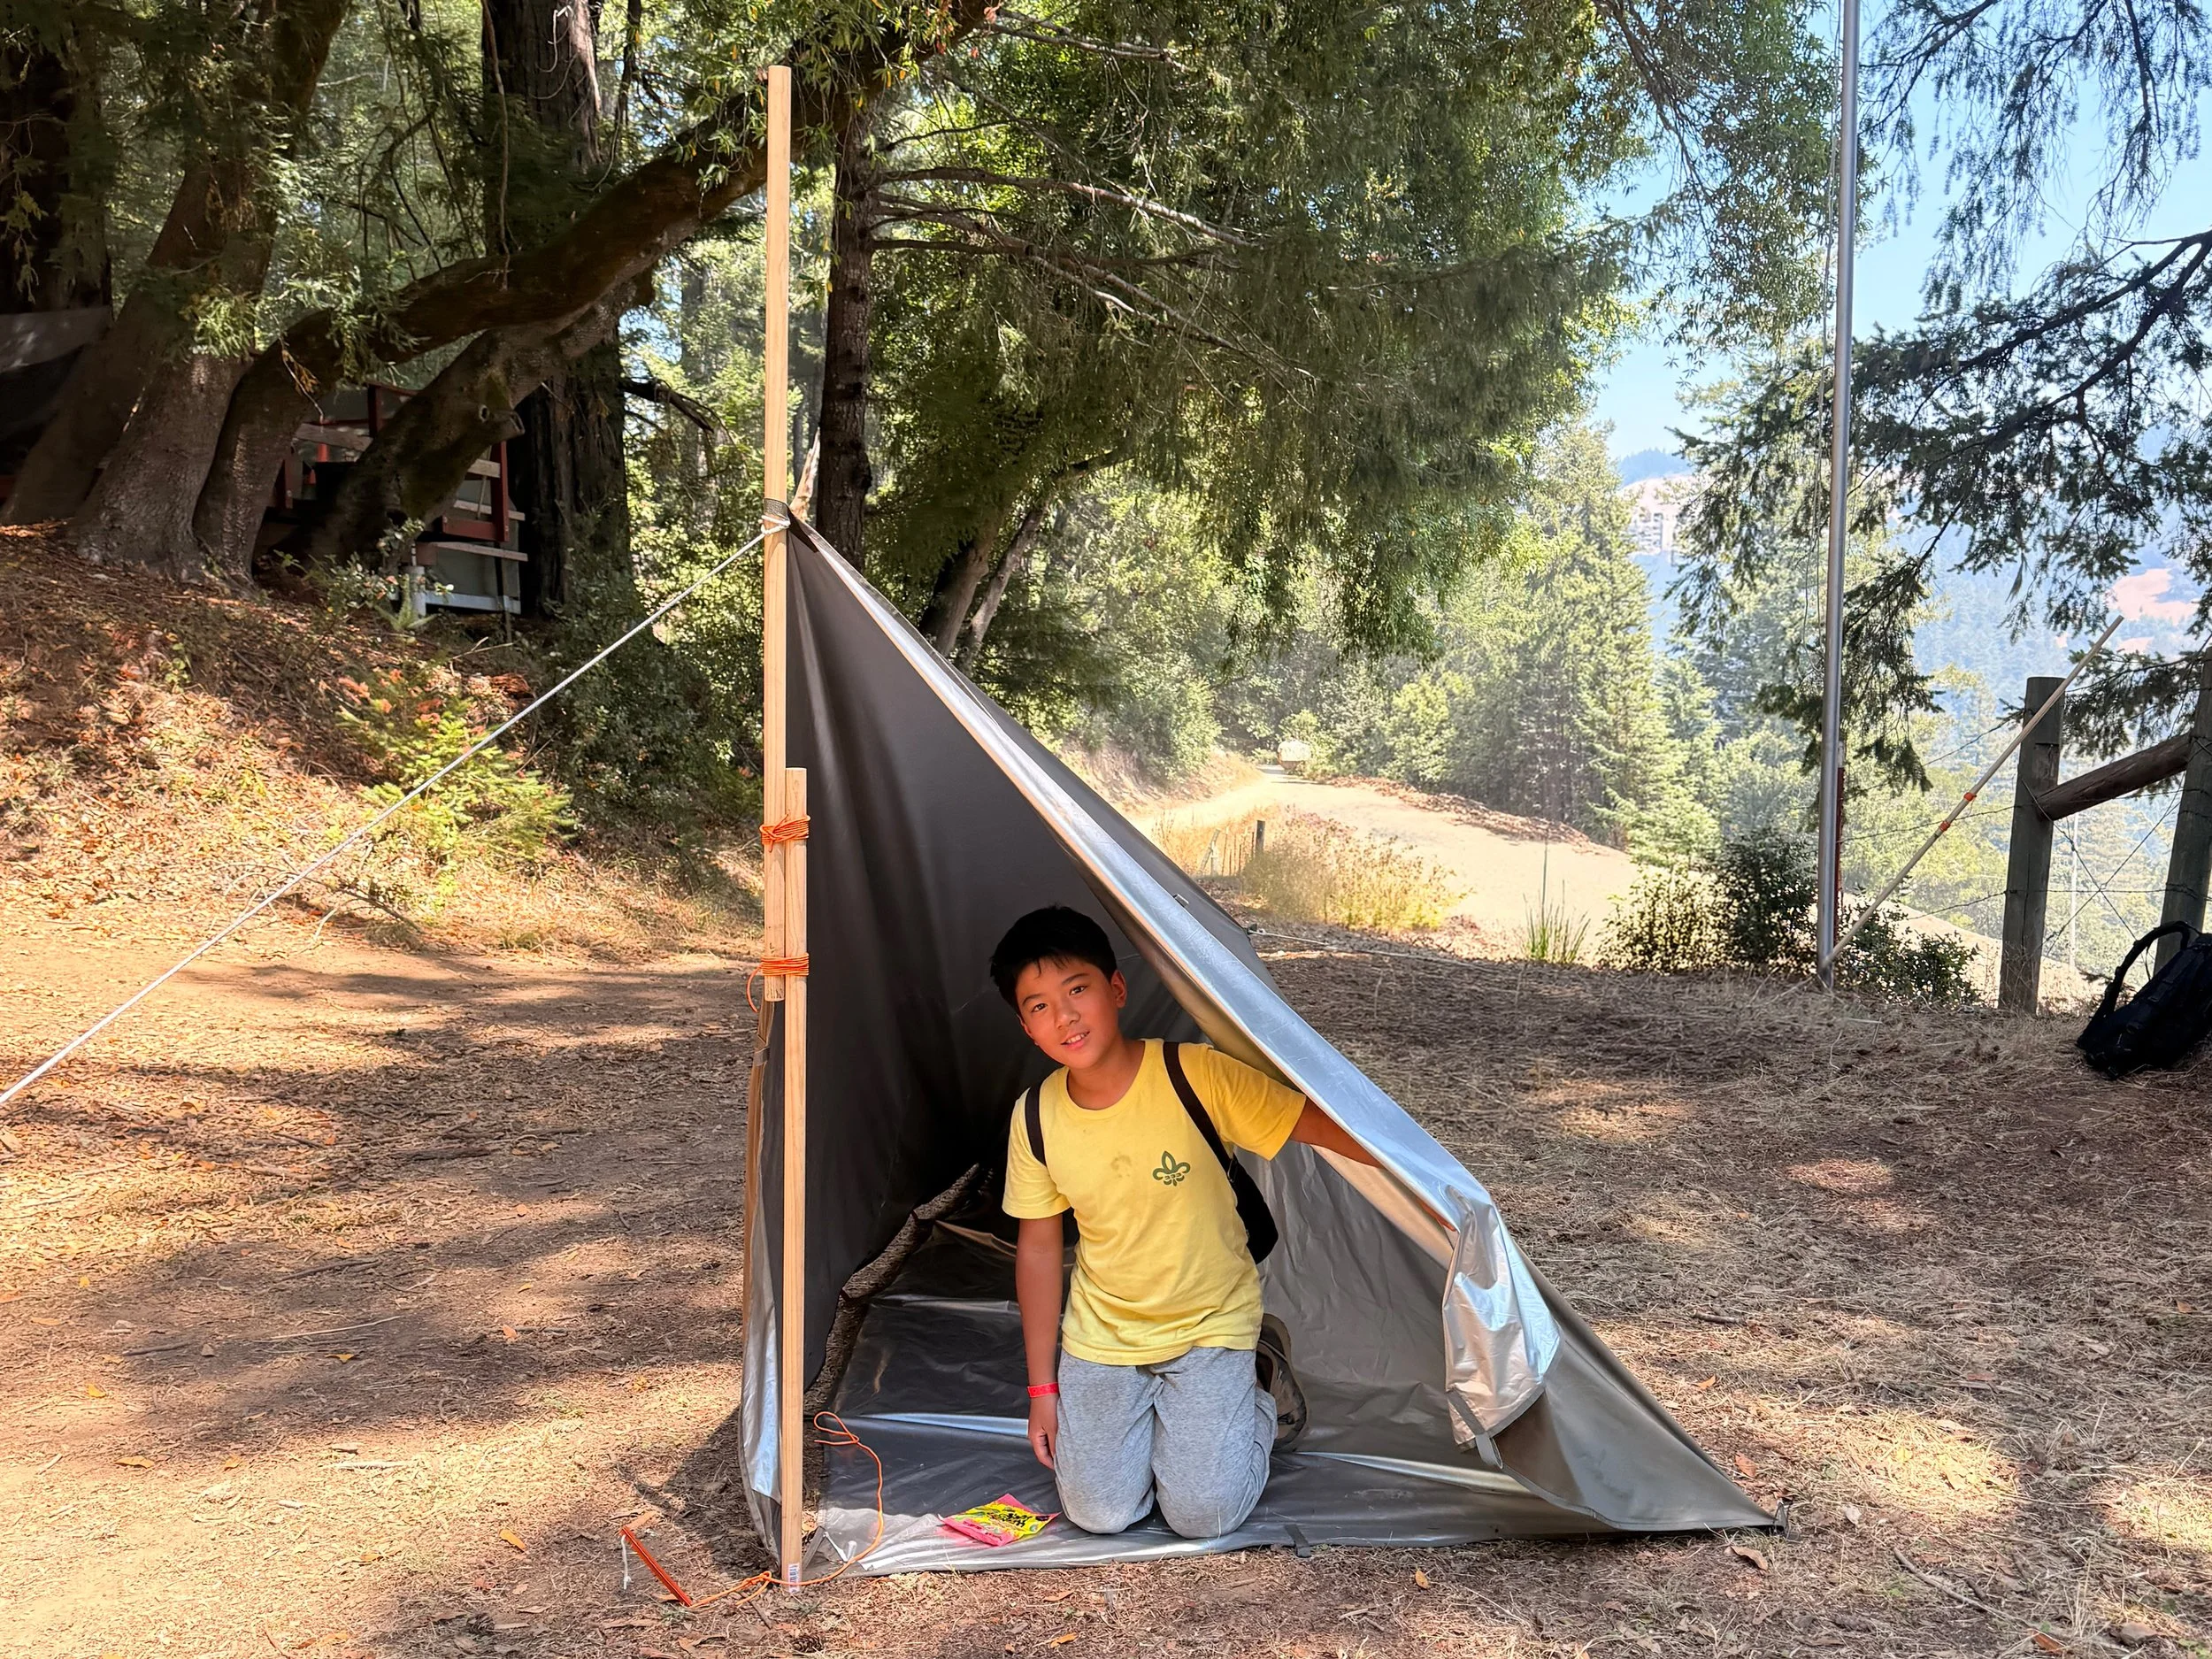
5. Fully Enclosed Tarp Tent with Floor & Door
This shelter only fits one person, and even then it is snug. But what you give up in space, you get back in protection. This single-tarp setup includes a floor and a door, keeping you fully protected from rain and wind, and it looks kind of magical when you set it up.
How to pitch it: Lay your tarp flat with the inside side facing up. If you’re using a tree as your upright, line up one edge of the tarp with the tree and stake both of the corners on that side. Next, stake the middle grommet or tie-out on the adjacent side (the side closest to the tree). Attach some cordage to the center tie-out on the side opposite the double-staked side. Pull cordage over to the tree, about 5-feet up, and tie it around the tree. Your tarp will fold into a triangular wedge, with the loose side hanging down as your door!
You want tension on both the diagonal ‘peak” of the roof and the vertical side of the shelter. If you’re using a stick or staves (as shown above) instead of a tree, create tension by securing the cordage to the upright and running a guy line from that point to the ground. If it feels a little cramped inside, you can create more space by tying a guy line to the center tie-out point on the sloped side of your shelter, and tensioning it out.
Best for: Overnight sleeping in exposed weather, bugs, or when you want full protection without carrying a dedicated tent.
Shelters: 1 person (2 in an emergency)
Materials: 10 × 10 tarp, 1 length of cordage, 3 stakes. If using the staves version, you’ll need those, plus an extra length of cordage and another stake. More stakes can help keep your side wall secure.
Knots & lashings: Two half hitches or a bowline to secure one tie-out to your upright. Potentially a taut-line hitch to tension the peak and/or upright pole. Round lashings if using staves.
Which One Should You Pitch?
Start by asking what you're protecting against—sun, wind, rain, insects, etc.—how many people need to fit under it, and what resources you have. As a general rule, the more sides you close off, the more weatherproof the shelter, but the more time, cordage, and stakes it takes to set up. On a short stop, the dining fly or lean-to will do. On an overnight in exposed terrain, it's worth the extra few minutes to pitch a pyramid or fully enclosed version.
Whichever pitch you choose, practice it before you need it. Setting up a tarp shelter in good weather at home is a lot easier than figuring it out for the first time in the rain!
Terms
Grommet — the reinforced metal or plastic ring set into the tarp's edges and corners. This is where you clip a carabiner, thread a line, or hook a stake-out point.
Tie-out — a loop of webbing or fabric sewn onto a tarp's edge (sometimes mid-panel, not just at a corner) used to pull out and stake a flat section so it doesn't sag or flap.
Guy line — a length of cord running from a grommet or tie-out to a stake, tree, or another anchor, used to pull the tarp taut and hold its shape.
Ridge line — the main line the tarp is draped over or hung from, usually run between two trees or two poles. It sets the "spine" of the shelter.
Pitch — the overall shape and angle you rig the tarp into (flat, angled, A-frame, pyramid, etc.).
Vestibule — a covered but unenclosed area at a shelter's entrance, useful for keeping boots and packs dry without bringing them inside.
Supplies Needed
One 10' x 10' tarp with grommets at the corners and mid-panel tie-outs along the edges
4–8 lengths of paracord 6–10 ft. each)
6–8 stakes (more for the fully enclosed version)
A center pole, trekking pole, or two trees for a ridge line, depending on the pitch. You can also use a stick.