

Field Notes
Wilderness Survival
Introduction
Scouts learn to select and use the clothing and gear they need, to make thoughtful plans, and do their best to manage risks in the wilderness. When the unexpected happens, wilderness survival skills can turn potential disaster into triumph.
The Rule of Threes
In wilderness survival, everything starts with understanding this very simple rule. You can survive:
Three hours without shelter
Three days without water
Three weeks without food
Just remembering this will help you prioritize the steps you take to keep yourself alive in a wilderness emergency.
The Seven Priorities
When you find yourself in an emergency situation it the wilderness, making a plan according to the seven priorities of survival will ensure you take care of your most important needs first. They are:
STOP. First Aid. Shelter. Fire. Signaling. Water. Food.
How and why these are important are described in requirement 2.
The Five Cs
The five Cs: (Cutting, Combustion, Cordage, Cover, and Containers) are an easy way to remember the essential tools you’ll want to include in a wildreness survival kit. These are explained in section 5.
Requirement 1
Wilderness Hazards
Explain to your counselor the hazards you are most likely to encounter while participating in wilderness survival activities, and what you should do to anticipate, help prevent, mitigate, or lessen these hazards.
| Hazard | Prevention | Treatment |
|---|---|---|
| Bad Weather | Know the weather before going out. Have a safe place to stay. | Find a safe place in bad weather. Stay away from open areas in lightning storms. |
| Altitude | Acclimate and ascent slowly. Stay Hydrated. | If you feel ill, descend to a lower elevation. |
| Injury | Wear sturdy shoes. Be careful when walking. Use tools correctly. | Carry a first aid kit. Know basic first aid. |
| Hypothermia | Check the forecast. Wear layers for cold weather. Have a dry change of clothes. | Warm up slowly. Stay dry and out of the wind. |
| Hyperthermia | Check the forecast. Wear sun protection and stay hydrated. | Rest in the shade. Sip water. Apply wet cloths to head/neck. |
| Dehydration | Carry adequate water and sip regularly—at least 1/2 liter per hour. | Rest in the shade. Drink water. Take Electrolytes. |
| Hunger | Snack regularly. Plan healthy, balanced meals for sustained energy. | Eat trail snack or enegrgy bars. Generally unwise to forage unlesss you really know what you're doing. |
| Stomach Problems | Wash your hands. Drink clean water. Eat familiar foods. | Drink extra water and rest. |
| Fatigue | Get adequate sleep before and during your trip. Stay hydrated. | Rest in a safe sheltered place. |
| Animals | Know what animals live in the area. Avoid surprising them. | Make yourself look big. Make noise. Slowly back away. Don’t run. |
| Insects | Wear clothes that cover you skin. Wear a mosquito net. Use bug repellent. | Smoke, wind, and cold all deter insects. Putting mud on your skin can be a barrier. |
| Snakes | Use a stick to sweep trall grass areas before you step. Be careful lifting rocks or logs. | Wash the wound with soap and water, dress it, and keep it below the heart. Seek medical help. |
| Fires | Keep fires small, safe, and watched. | Have water or dirt ready to put out the fire. Plan multiple egress points in the event of wildfire. |
| Getting Lost | Carry a map and compass and know how o use them. Tell someone where you’re going. | S.T.O.P. Stay where you are. Signal for help. |
Requirement 1(b)
Show that you know first aid for and how to prevent injuries or illnesses likely to occur in backcountry settings, including hypothermia, heat reactions, frostbite, dehydration, blisters, insect stings, tick bites, snakebites.
The table below is a summary of the preventions and treatments for common wilderness first aid issues. Treat it as a reminder. It is not a substitute for actual first aid training. To be signed off on this requirement, you must demonstrate these techniques to your counselor.
| Issue | Prevention | First Aid |
|---|---|---|
| Dehydration | Drink at least 1/2 liter water per hour. Sip regularly. Avoid dehydrating foods. | Drink water in small sips. Rest. |
| Hypothermia | Dress warmly in layers. Keep dry. | Make sure the victim is dry and in dry clothes.Warm them slowly with blankets and fire. Share body heat if necessary. |
| Hyperthermia | Drink water regularly. Wear light clothes and wide brimmed hat. Rest in shade. | Move to shade. Loosen clothing. Sip water. Apply wet cloths to head and neck. |
| Frostbite | Cover exposed skin. Dress warm, esp. gloves and socks. Use handwarmers for prevention only. | Gently warm the affected skin with hands or warm water. Do not use direct heat. Never rub. |
| Blisters | Wear well-fitting shoes and clean, dry socks. Protect against friction with moleskin. | Clean gently and cover with bandage. Do not pop. |
| Insect Stings | Wear long sleeves, pants, and a bug net for your face. Use insect repellent. | Remove stinger by scraping, not pinching. Apply cold pack if swollen. |
| Tick Bites | Wear long clothing. Check body regularly. Avoid tall grass. Use repellent. | Use tweezers to remove tick gently. Do not twist. Clean area. Save the tick in a vial of rubbing alcohol. |
| Snakebites | Be cautious where you step. Be especially careful when moving rocks or logs. | Stay calm. Wash with soap and water. Keep bitten area still and low. Seek medical help immediately. |
Requirement 2
The 7 Priorities of Survival
From memory, list the seven priorities for survival in a backcountry or wilderness location. Explain the importance of each one with your counselor
STOP
Stop. Calm down. Drink some water. Have a bit of your trail food. Assess your situation and the resources that you have. If you have pen and paper, write some things down while they’re fresh in your memory. Record the time.
Think. Stay calm and think about your situation logically (you’re probably been reacting emotionally or instinctively until now).
Observe. Take a look around. Where is a good place for a shelter? Do you have dry wood? Is there water nearby? Do you see any obvious trails, landmarks, peaks, or clearings?
Plan. Come up with a plan for the next 15 minutes. Then the next half hour. Then the next hour. Your plan should be about keeping yourself safe, sheltered, warm, hydrated, and findable—in that order.
First Aid
Address life-threatening injuries immediately. Take care of any other first aid needs. In a survival situation, a small cut can easily get infected. A minor sprain can hinder your ability to make shelter or get water.
Shelter
Body temperature is key to your survival. You may need to shelter yourself from rain, snow, cold, or heat. Stay dry. Shelter helps you keep your core body temperature stable, especially in cold, wet, or windy conditions. In the wilderness, there are plenty of resources for shelter building. You may have also brought some with you. Emergency blankets can be made into tents or bivvies. You can built a lean-to or debris hut. A cave or rock face may give you some shelter too—anything to protect yourself from the elements.
Fire
Your fire will probably be the thing that saves your life; whether it’s because it keeps you warm, helps you purify water, or creates the smoke or light that rescuers spot.
Signaling
Besides fire, you can signal for help using a signal mirror to flash searching planes, distant vehicles or populated areas. A loud whistle works day or night. Ground to air symbols can be constructed in clearings. A flashlight or glow stick can signal at night. Assess your options early and, if possible, build a signal fire separate from your warming fire that you can ignite at the first sign of rescuers.
Water
Yes, you can survive about 3 days without water. But in hot weather it may be a matter of hours. As you become dehydrated you also become disoriented and confused, leading to bad decisions. This means you’ll need to find and purify water. Water from rivers, streams, and lakes is almost never safe to drink untreated. Pre-filter water by pouring it slowly through a bandana or t-shirt. This gets out the mud and large particles. Then purify it by boiling. Water purification tablets work too but aren’t as effective. A LifeStraw can be a life-saver. Drink water until your urine is clear.
Treat any water you collect before drinking it, but if that isn’t possible, drink it anyway. In a true survival situation, the danger of becoming dehydrated outweighs the possibility of becoming ill.
Food
You can survive three weeks or more without food. Ration whatever food that you may have in your pack to make it last longer. Unless you’re a highly accomplished and practiced forager or hunter, the energy you burn looking for food is better used to address your other survival priorities.
Requirement 3
Staying Calm
Describe ways to avoid panic and maintain a high level of morale when lost, and explain why this is important.
Being lost in the wilderness is frightening. Whether you’re alone or with others, when darkness sets in and the temperature drops it’s natural to fear for your safety. That’s your brain warning you that you’re in trouble. But if you’re well-prepared and keep your wits about you, you can quickly move your brain into the next phase: survival mode. How? Here are six strategies for staying calm:


Requirement 4
Environmental Conditions
Describe the steps you would take to survive in the following exposure conditions: (a) cold and snowy; (b) wet; (c) hot and dry; (d) windy; (e) At or on the water.
-
Dress Appropriately: Wear layers to trap heat and wick moisture away from your skin. Layers should include a thermal layer, an insulating layer, and a water/wind proof outer layer.
Build Shelter: A snow cave will protect you from the wind and cold. Keep it small to trap body heat more effectively.
Fire: A small fire can generate enough warmth to keep you alive and melt snow for drinking water.
Signaling: Rocks and branches (or anything dark) will contrast with the snow. Signal fires can be seen at night; smoke can be seen by day. Flash the horizon with a signal mirror several times an hour. Use your whistle.
Conserve Energy: Physical exertion burns calories which makes you sweat, which can lead to hypothermia. Conserve energy and ration food.
Stay Hydrated: Melt snow for drinking water. Don’t eat snow or drink cold water. It lowers your body temperature which can lead to hypothermia.
-
Find Shelter: Your first priority is to find or build a shelter that keeps you dry. Next, get dry. Change out of wet clothes to keep your core temperature up and stable.
Stay Dry: Wear a waterproof shell and quick-drying layers. Use waterproof gear. Use waterproof liners or bags inside your pack and a water-resistant cover outside.
Fire: Starting a fire is tough in wet conditions. Look for dry wood in the inner parts of fallen trees under thick bushes, and other sheltered areas. Carve away the outer layers of wet wood to find a dryer core. Once you start your fire, place wet wood nearby so the heat dries it out.
Water: Rainwater is generally safe to drink. Use containers or leaves to collect water. Squeeze drinking water from wet clothes. Collect runoff form your tarp or tent. Boil of possible.
Food: Bring high-energy foods that don’t require cooking (since making fire will be difficult).
Move Carefully: Wet ground is slippery. Move slowly and deliberately to avoid injury.
-
Stay out of the Sun: Rest in the shade whenever possible. Try to limit physical activity to early morning or late evening when it’s cooler.
Hydrate: Conserve/ration water, but not to the point of thirst. Take small sips regularly.
Clothing: Wear light-colored, loose-fitting clothing. Cover exposed skin to prevent sunburn. Wear a wide brimmed hat for shade.
Signaling: Use a mirror or reflective object to signal aircraft. Flash the horizon at regular intervals. Use rocks to make large (15 feet+) ground to air symbols.
Eat Less: Digestion requires water from your body. If water is scarce it can be better to fast than risk dehydration.
-
Shelter: Look nearby for secure, natural shelters like caves or boulders. Shelter under a tarp or in a tent. Build a windbreak or debris hut.
Wear Layers: Wind moves heat away from the body. Wear layers to trap warm air. Protect that heat with a windproof outer shell..
Secure Gear: Keep your gear—especially lighter item like clothes, maps, tarps, etc. secure so they don’t blow away.
Fire: Use a windbreak and dig a pit to help get your first started and keep it contained. contained, or make Dakota fire hole.
Ground to Air Signals: Use heavier items like rocks to make signals. Lighter branches or burrows may blow away.
-
Flotation: Always wear a life jacket. In an emergency, improvise a flotation device using anything buoyant. Even trapping air in clothing can help. Reduce heat loss by keeping as much of your body out of the water as possible.
Signaling Use flares, a whistle, or a mirror to attract to potential rescuers. If you have a pole and some form of fabric, a flag can help. At night, use a flashlight.
Stay Together: If you’re in a group, stay close to increase visibility. Use cordage to keep everyone connected. Conserve heat and energy by assuming the HELP position.
Conserve Energy: Swimming or treading water uses a lot of energy. Float on your back or rest on floating debris or extra life jackets if possible.
Hydration: Never ever, ever drink seawater, not mater how thirsty you are. Never. Not ever. Drinking saltwater will dehydrate you faster than not drinking at all. Previously stored water and rainwater are pretty much your only options.
Sun Protection: Use clothing or whatever you have to shade yourself from the sun. Use sunglasses (or make some with duct tape) to protect from glare from the water.
Requirement 5
Your Personal Survival Kit
Put together a personal survival kit and be able to explain how each item in it could be useful.
A personal survival kit is a minimal set of tools to help you address your survival priorities of shelter, warmth, signaling, and water. It should be compact, lightweight, and waterproof, and it should be carried on any wilderness trek. More important that the tools is the knowledge and skill of how to use them. A fire starting kit is useless is you don’t know how to build and maintain a fire, how to ignite it with the tools you have, and if you’ve never practiced using it on with wet wood in windy conditions.
Your survival kit will vary depending on the terrain and conditions you anticipate, your skills, and your personal preferences. Here are some suggestions to get you started, organized according to the Five Cs:
Cutting
You’ll need a reliable cutting tool to process firewood, cut cordage, and a myriad of other tasks. Consider one of these options:
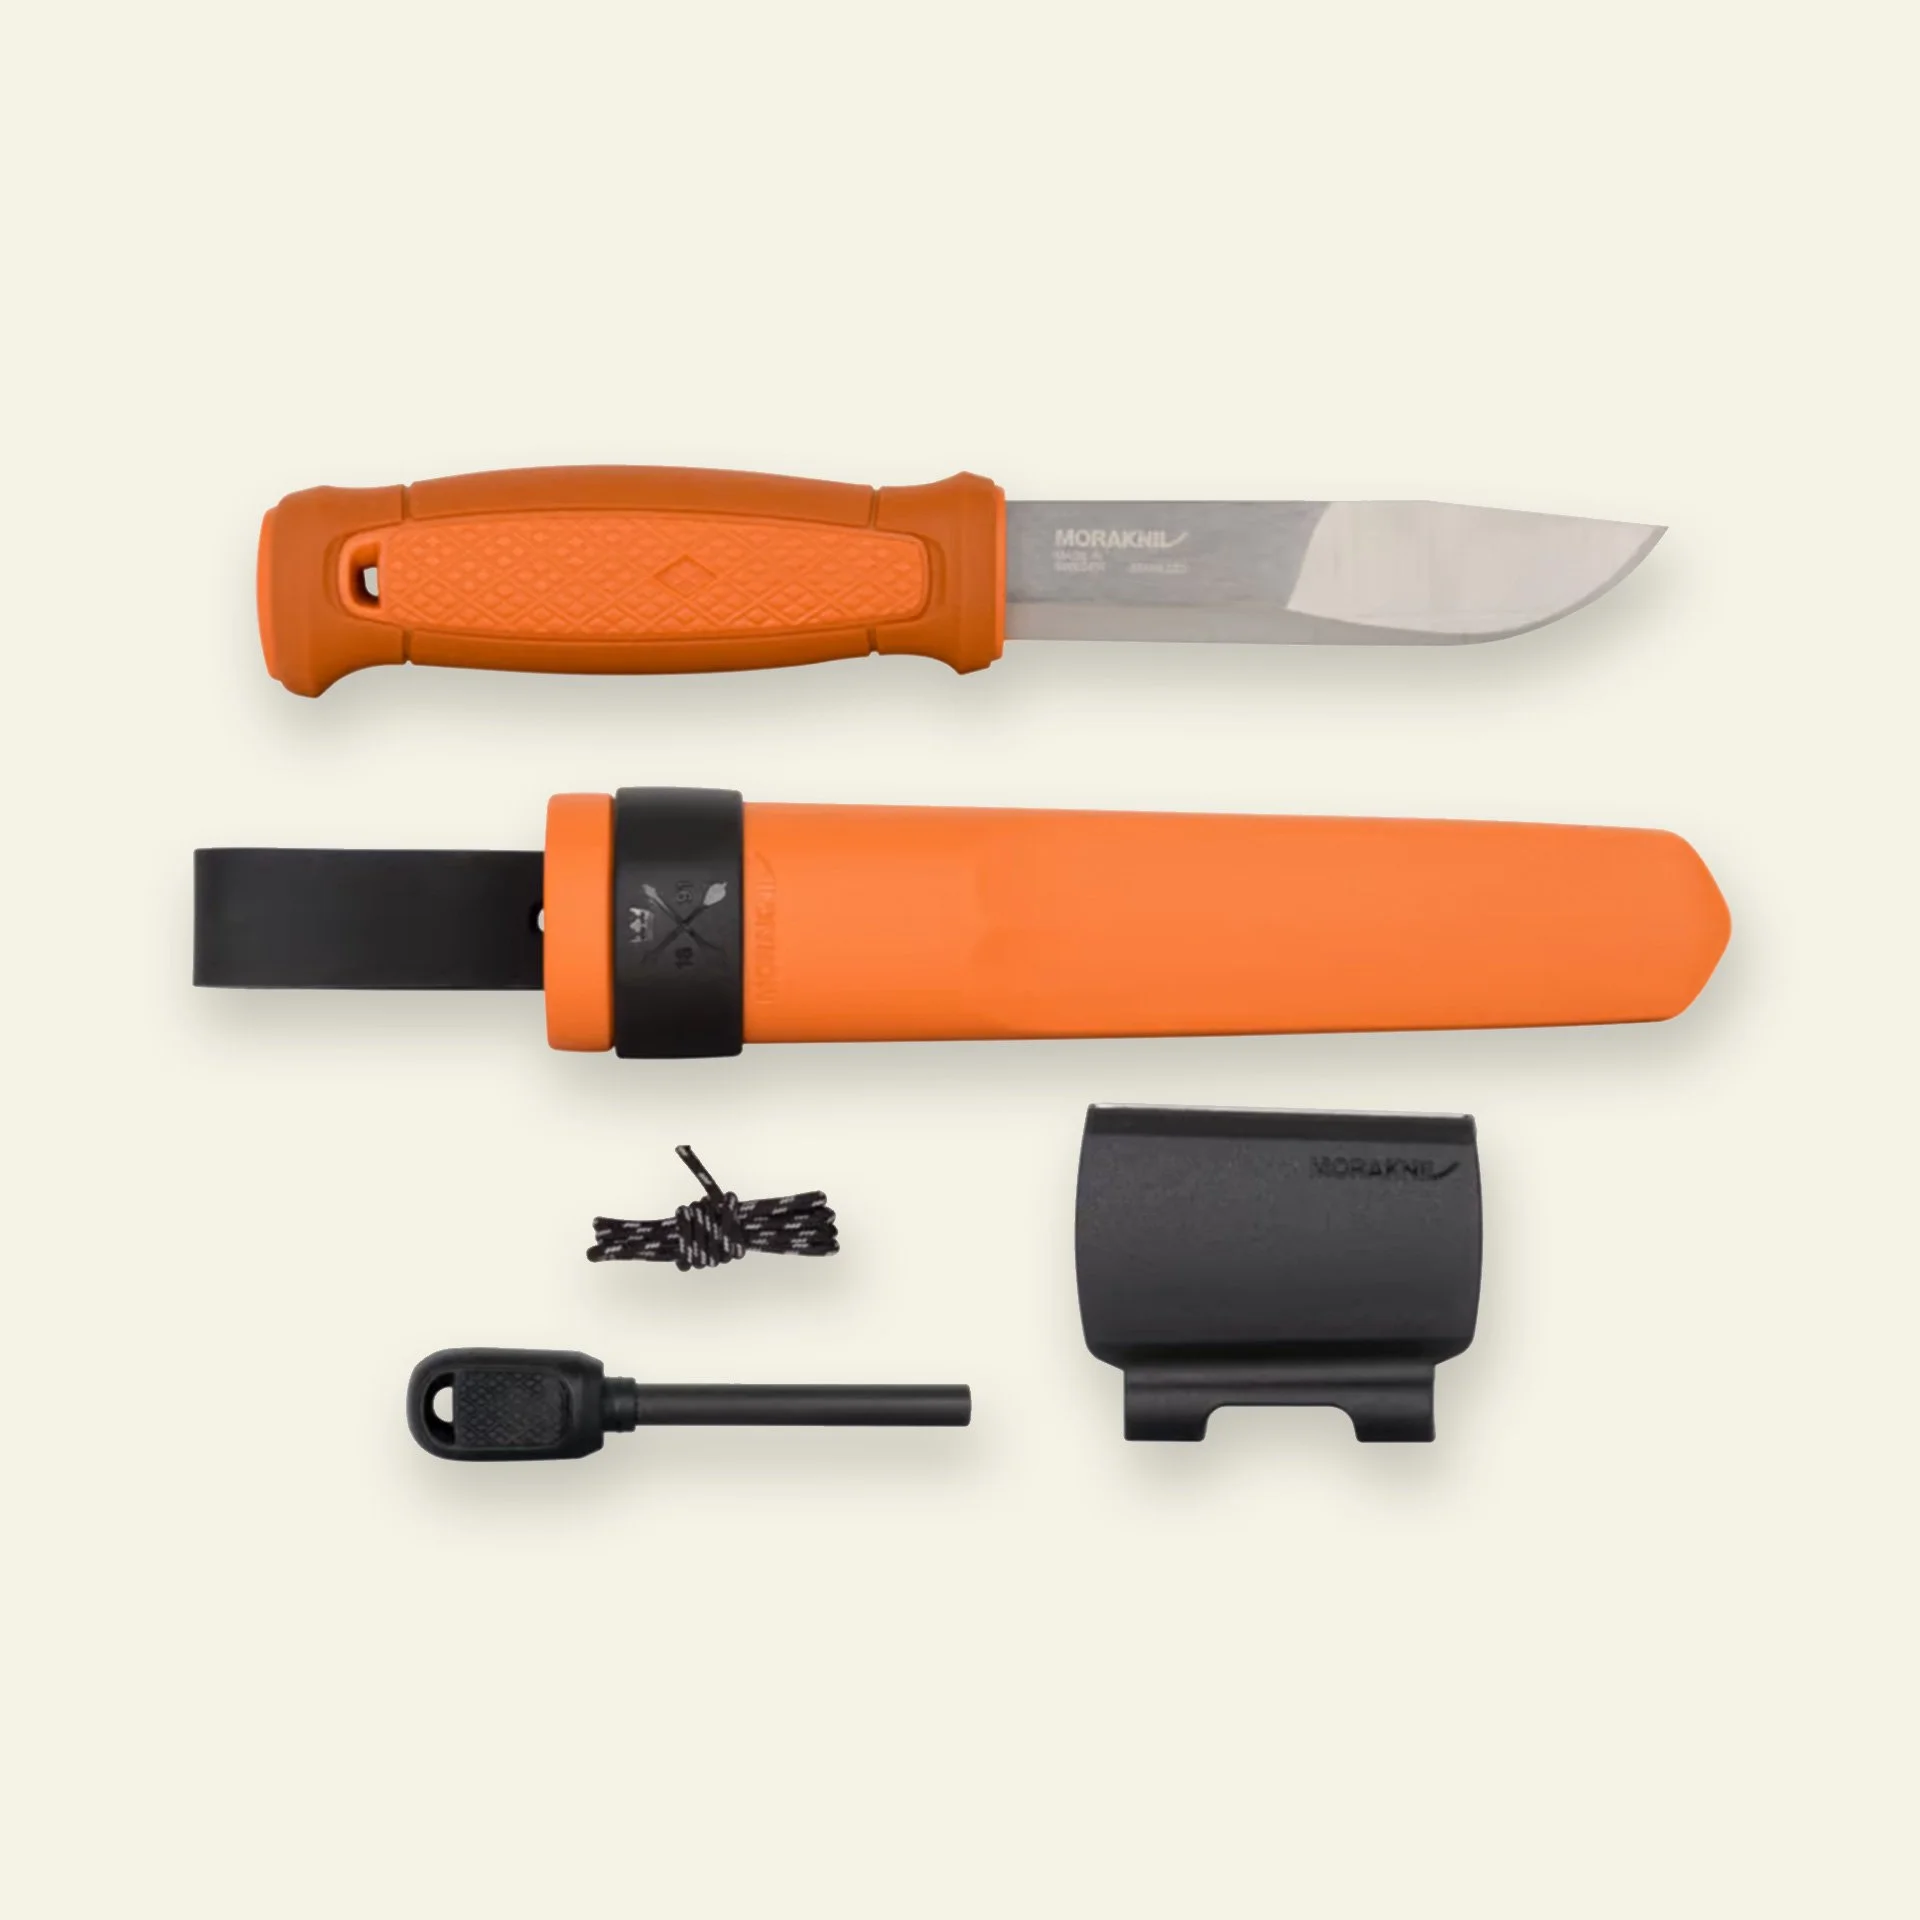
Swiss Army Knife: Compact, reliable, multiple tools. Not very effective for processing firewood.
Morakniv: Lightweight, 4" fixed blade for heavier duty tasks. Some have built-in-fire steel.
Multi-tool: Larger cutting blade than a Swiss army, has numerous repair tools, but heavy.
Combustion
Fire is critical for warmth, purifying water, and signaling. Being able to build, light, and maintain a fire is one of your top survival priorities. A good kit will include 2 or more of the following:
Waterproof Matches: Essential. Store them in a watertight container.
Bic Lighters: Light, small, and cheap. Won’t work wet.
Fire Steel: Ferrocenium rod with striker. Practice with it!
Fire Starter: Magnesium, char cloth, dryer lint, fire starting cubes.
Cover
Preventing heat loss from exposure to the elements is critical. In some environments, so is having a way to shade yourself from the sun.
Emergency Blanket: Reflects body heat and can act as a makeshift shelter. Essential to any kit.
Sun Protection: Sunblock stick, bandana for improvised hat (and other uses).
Cordage
Use it to string up or lash a shelter, swing a glow stick, or make repairs. It can also be used to secure a splint, make a tourniquet, make a sling or stretcher, catch a fish, start a fire, or suspend your gear. In many ways, it’s the backbone of your survival kit.
Paracord: Choose quality “mil spec” 550 paracord. 25 ft. minimum. 50ft. if you have room.
Survivorcord: The brand has woven in fishing line, snare wire, and fire starter.
Containers
In addition to storing everything in a waterproof bag or bottle (e.g. Nalgene), a container for gathering, purifying, and storing water is essential.
Nalgene: You can store your entire kit in here. It’s waterproof and will float.
Titanium Cup: Ultralight, durable, can be used to boil water.
Ziplock Bags: Multi-purpose for carrying water or food.
Contractors Bag: Large heavy-duty trash bag. Can carry gear and make a poncho or shelter.
Rounding it out
The Five Cs cover most of the important essentials, but you’ll want to add a few important items depending on the choices you’ve made above and your bushcraft proficiency.
Water Purification
If you have a metal container for boiling water and you’re confident in your fire making abilities, you have a way to purify water. It’s good to have a second option such as a filter straw or tablets (note that tablets don’t protect against parasites like cryptosporidium).
Water Purification Tablets: Make natural water sources safe(r) when boiling isn’t an option.
LifeStraw: Safe drinking water on demand. They make compact versions.
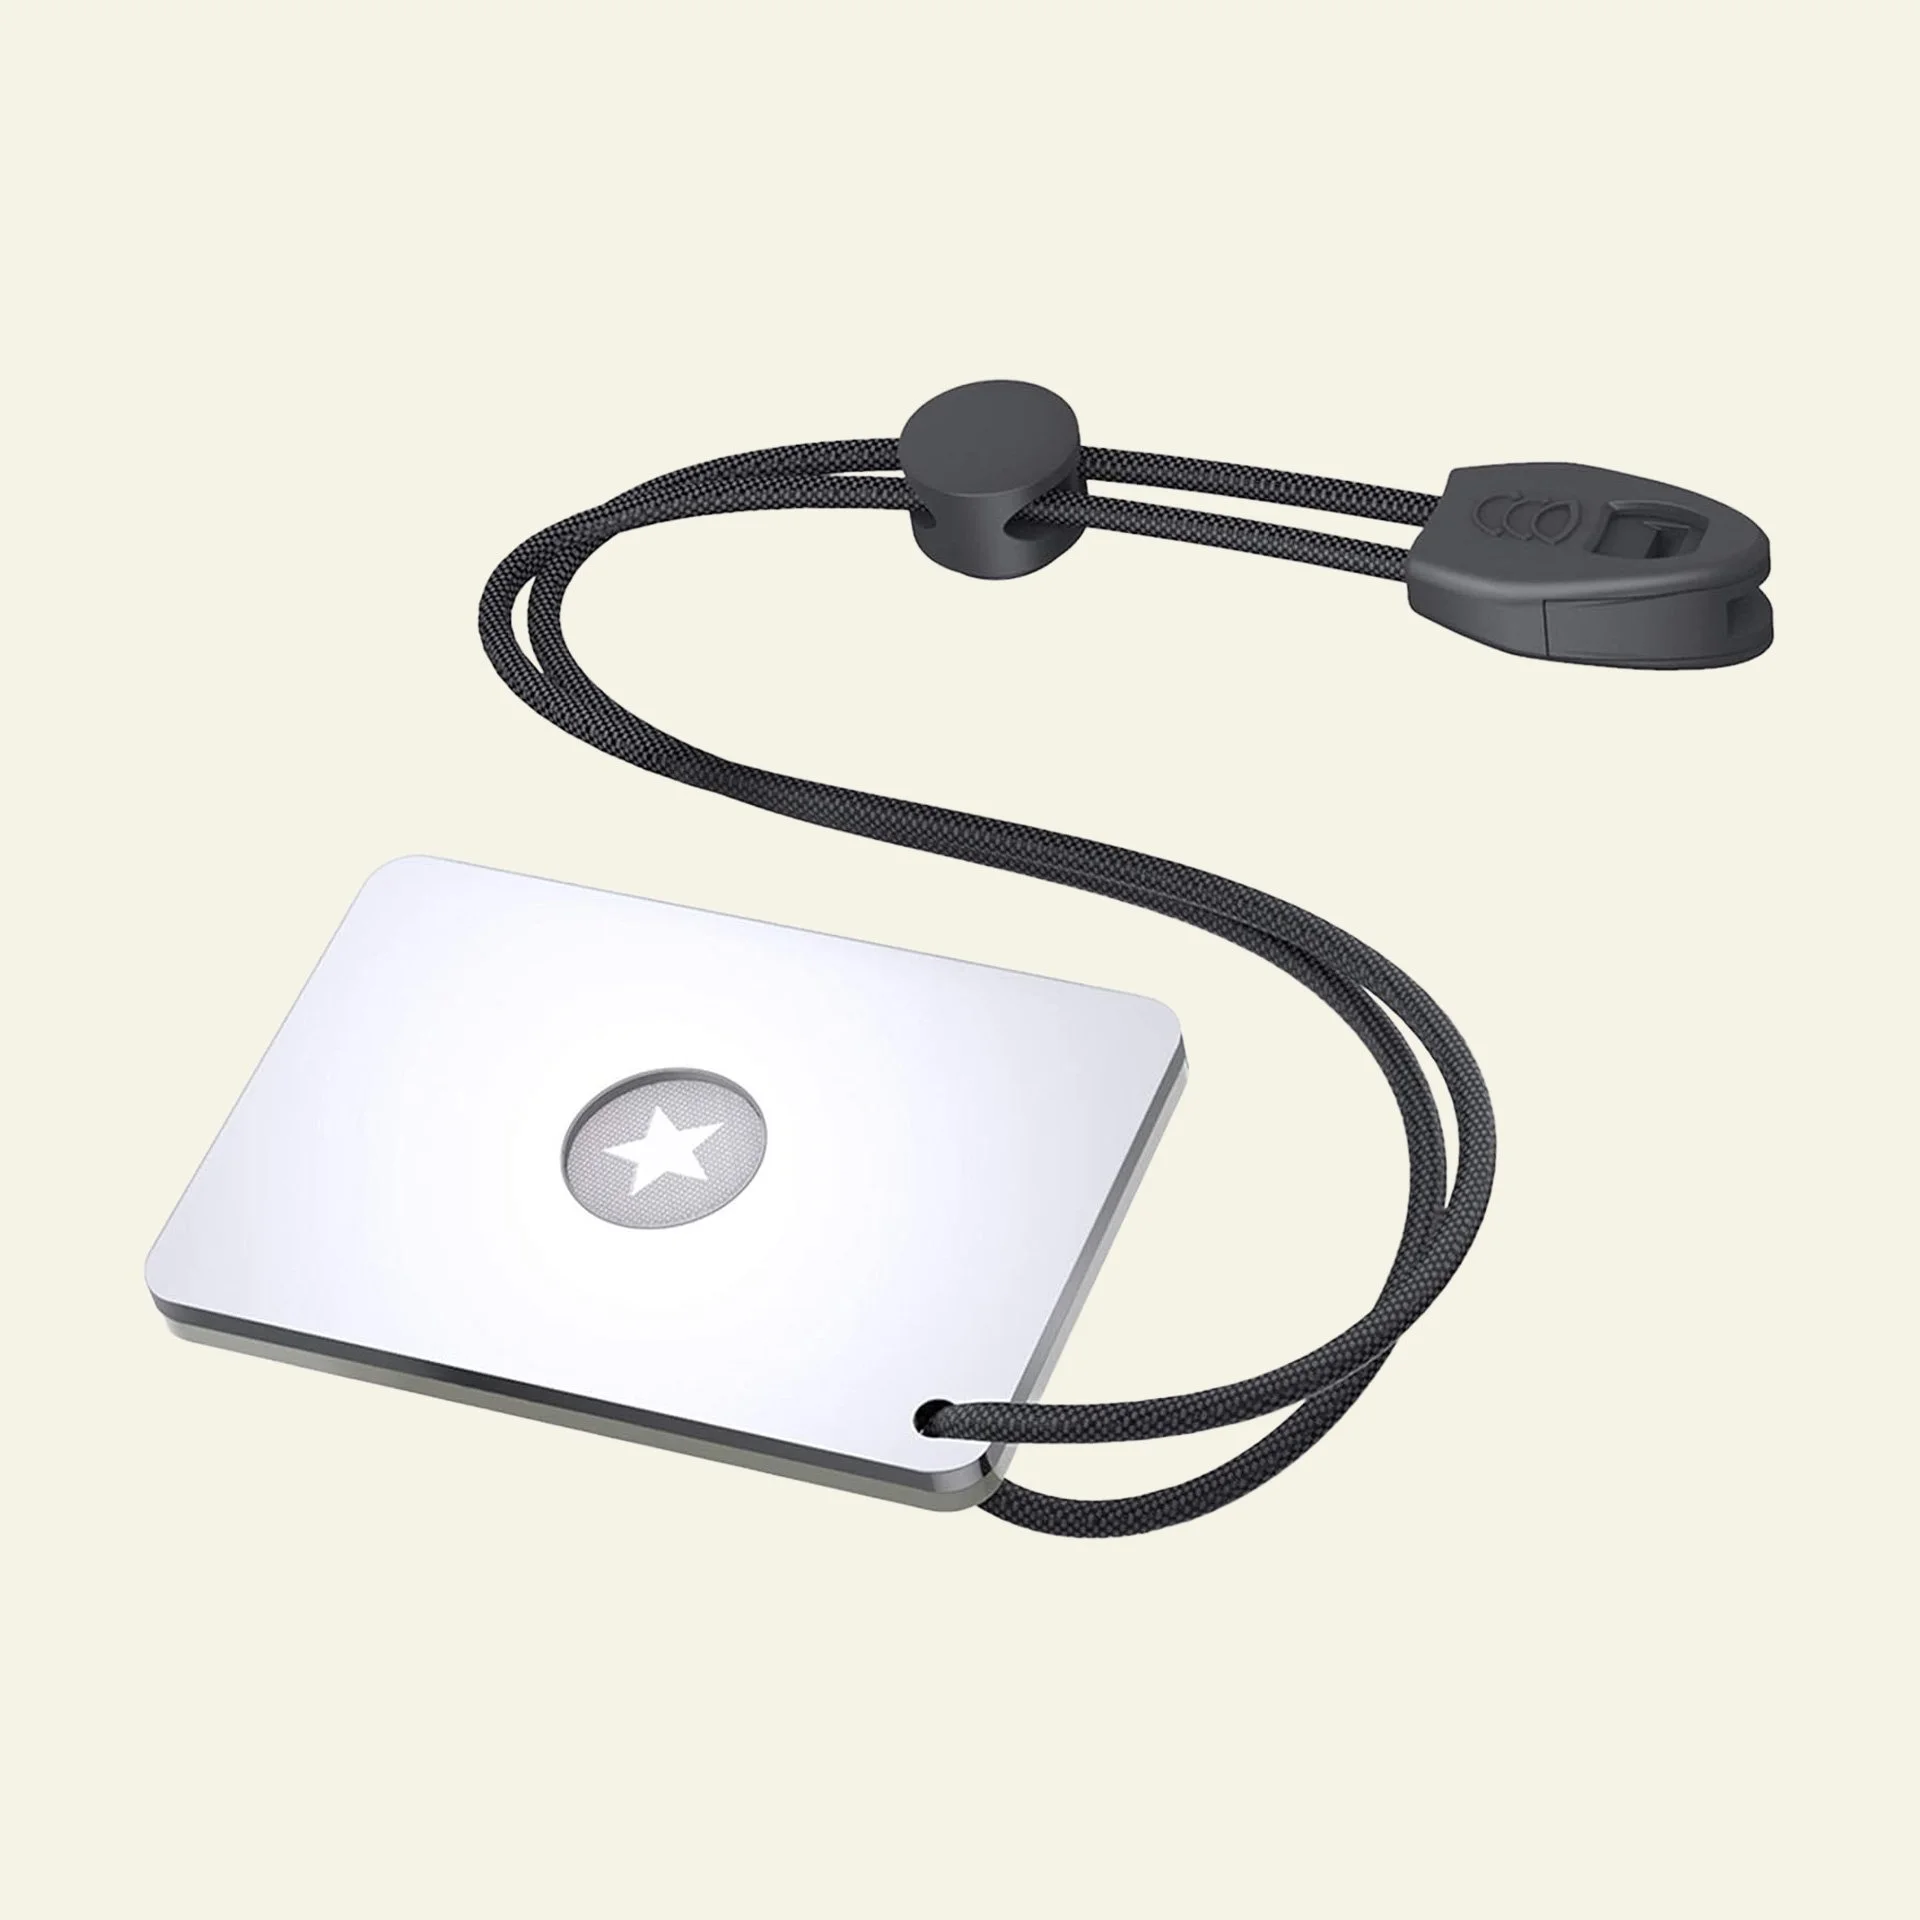
Signaling
Get found! After taking care of your basic life-systems (body temperature and hydration), your top priority is to be found. In addition to fire, a whistle and signal mirror are small, lightweight methods of attracting attention, but you could add all for of these to your kit:
Whistle: For long-distance signaling. Works day or night.
Signal Mirror: For daytime signaling up to 6–10 miles (20 miles ground-to-air) .
Mini Flashlight: For night signaling and seeing in the dark
Chem Light: (aka glow stick) swing it from a paracord to make a large visible signal at night
Rounding it out
Last but not least (well, actually, last and least) these items will help round out your kit:
Compact First Aid Kit: A mini backup version of the PFAK you should already be carrying.
Compass: For orientation.
Duct or Gaffers Tape: For repairs first aid, and more. They make mini rolls.
Waterproof Notebook & Pen: Leave a note, mark a trail, note the time of an injury.
Survival Manual: A small booklet with survival and first aid tips.
Eye protection: Disposal sun protection film from your eye doctor for improvised sunglasses
Energy Bars: For immediate energy needs.
Survival Gear
Remember, skills are more important than stuff. That said, having a few tools and supplies will greatly enhance your chances. These are some of the products we’ve tested and recommend, but you can build an effective kit just by shopping at a hardware store.


Requirement 6
Building Fires
Using three different methods (other than matches), build and light three fires.
In a survival situation, being able to make a fire can be the difference between life and death. Fire provides warmth, a way to make water safe for drinking, and way to signal for help. But what if you don’t have matches? Here are a few alternatives. Be sure to practice these before you need them.
Flint & Steel
Materials:
Flint (technically a ferrocenium rod)
Striker or the backside of a knife
Tinder
Steps:
Place your tinder in a secure spot.
Hold the ferro rod close to the tinder.
Swiftly scrape the rod with the striker. This will produce sparks.
Catch the sparks in the tinder until it smolders. Blow gently to help it ignite.
Gradually add kindling to build the flame.
Bow Drill
Materials:
A bent stick (bow)
A straight stick (spindle/drill)
String or cord
A flat piece of wood (fireboard)
Tinder
Steps:
Craft a bow using the bent stick and cord.
Carve a small, keyhole-shaped divot near the edge of the fireboard. Place a leaf under the keyhole to capture the ember you’ll produce.
Place one end of the spindle into the divot.
Use the bow to spin the spindle rapidly by moving it back and forth in a “sawing” motion.
The friction will produce heat. Continue spinning the spindle after you see smoke to help the ember form.
Use the leaf to move the ember to your tinder and gently blow until a flame appears.
Magnifying Glass
Materials:
A magnifying glass or a clear plastic bottle filled with water
Tinder (very dry)
Steps:
Find a spot with direct sunlight.
Hold the magnifying glass above the tinder. Focus the sun’s rays until it forms a pinpoint on the tinder.
Keep steady until the tinder starts to smolder.
When you see smoke, blow gently to produce a flame.
Requirement 7
Signaling
Requirement 7(a)
Show five different ways to attract attention when lost.
If you find yourself completely lost, make your position known as soon as possible.To do this is, you’ll need some kind attention-getting device. This can be anything that contrasts with the natural look or sounds of the area.
Fly a large tarp of contrasting color from a tall tree.
Set up the appropriate ground-to air signal (see below)
Use the universal distress signal. This is any signal repeated three times: Three shouts, three blasts of whistle, three fires or columns of smoke, three large piles of stones, etc.
Sweep the horizon with a signal mirror or other reflective surface at various intervals throughout the day. On bright days the reflected light can be easily spotted by a plane. Even on hazy days it can be seen by aircraft.
If in contact with someone, send the SOS Morse code distress call. Use a flag or send by interrupted light or sound: flashlight, lantern, mirror, whistle, radio.
Requirement 7(b)
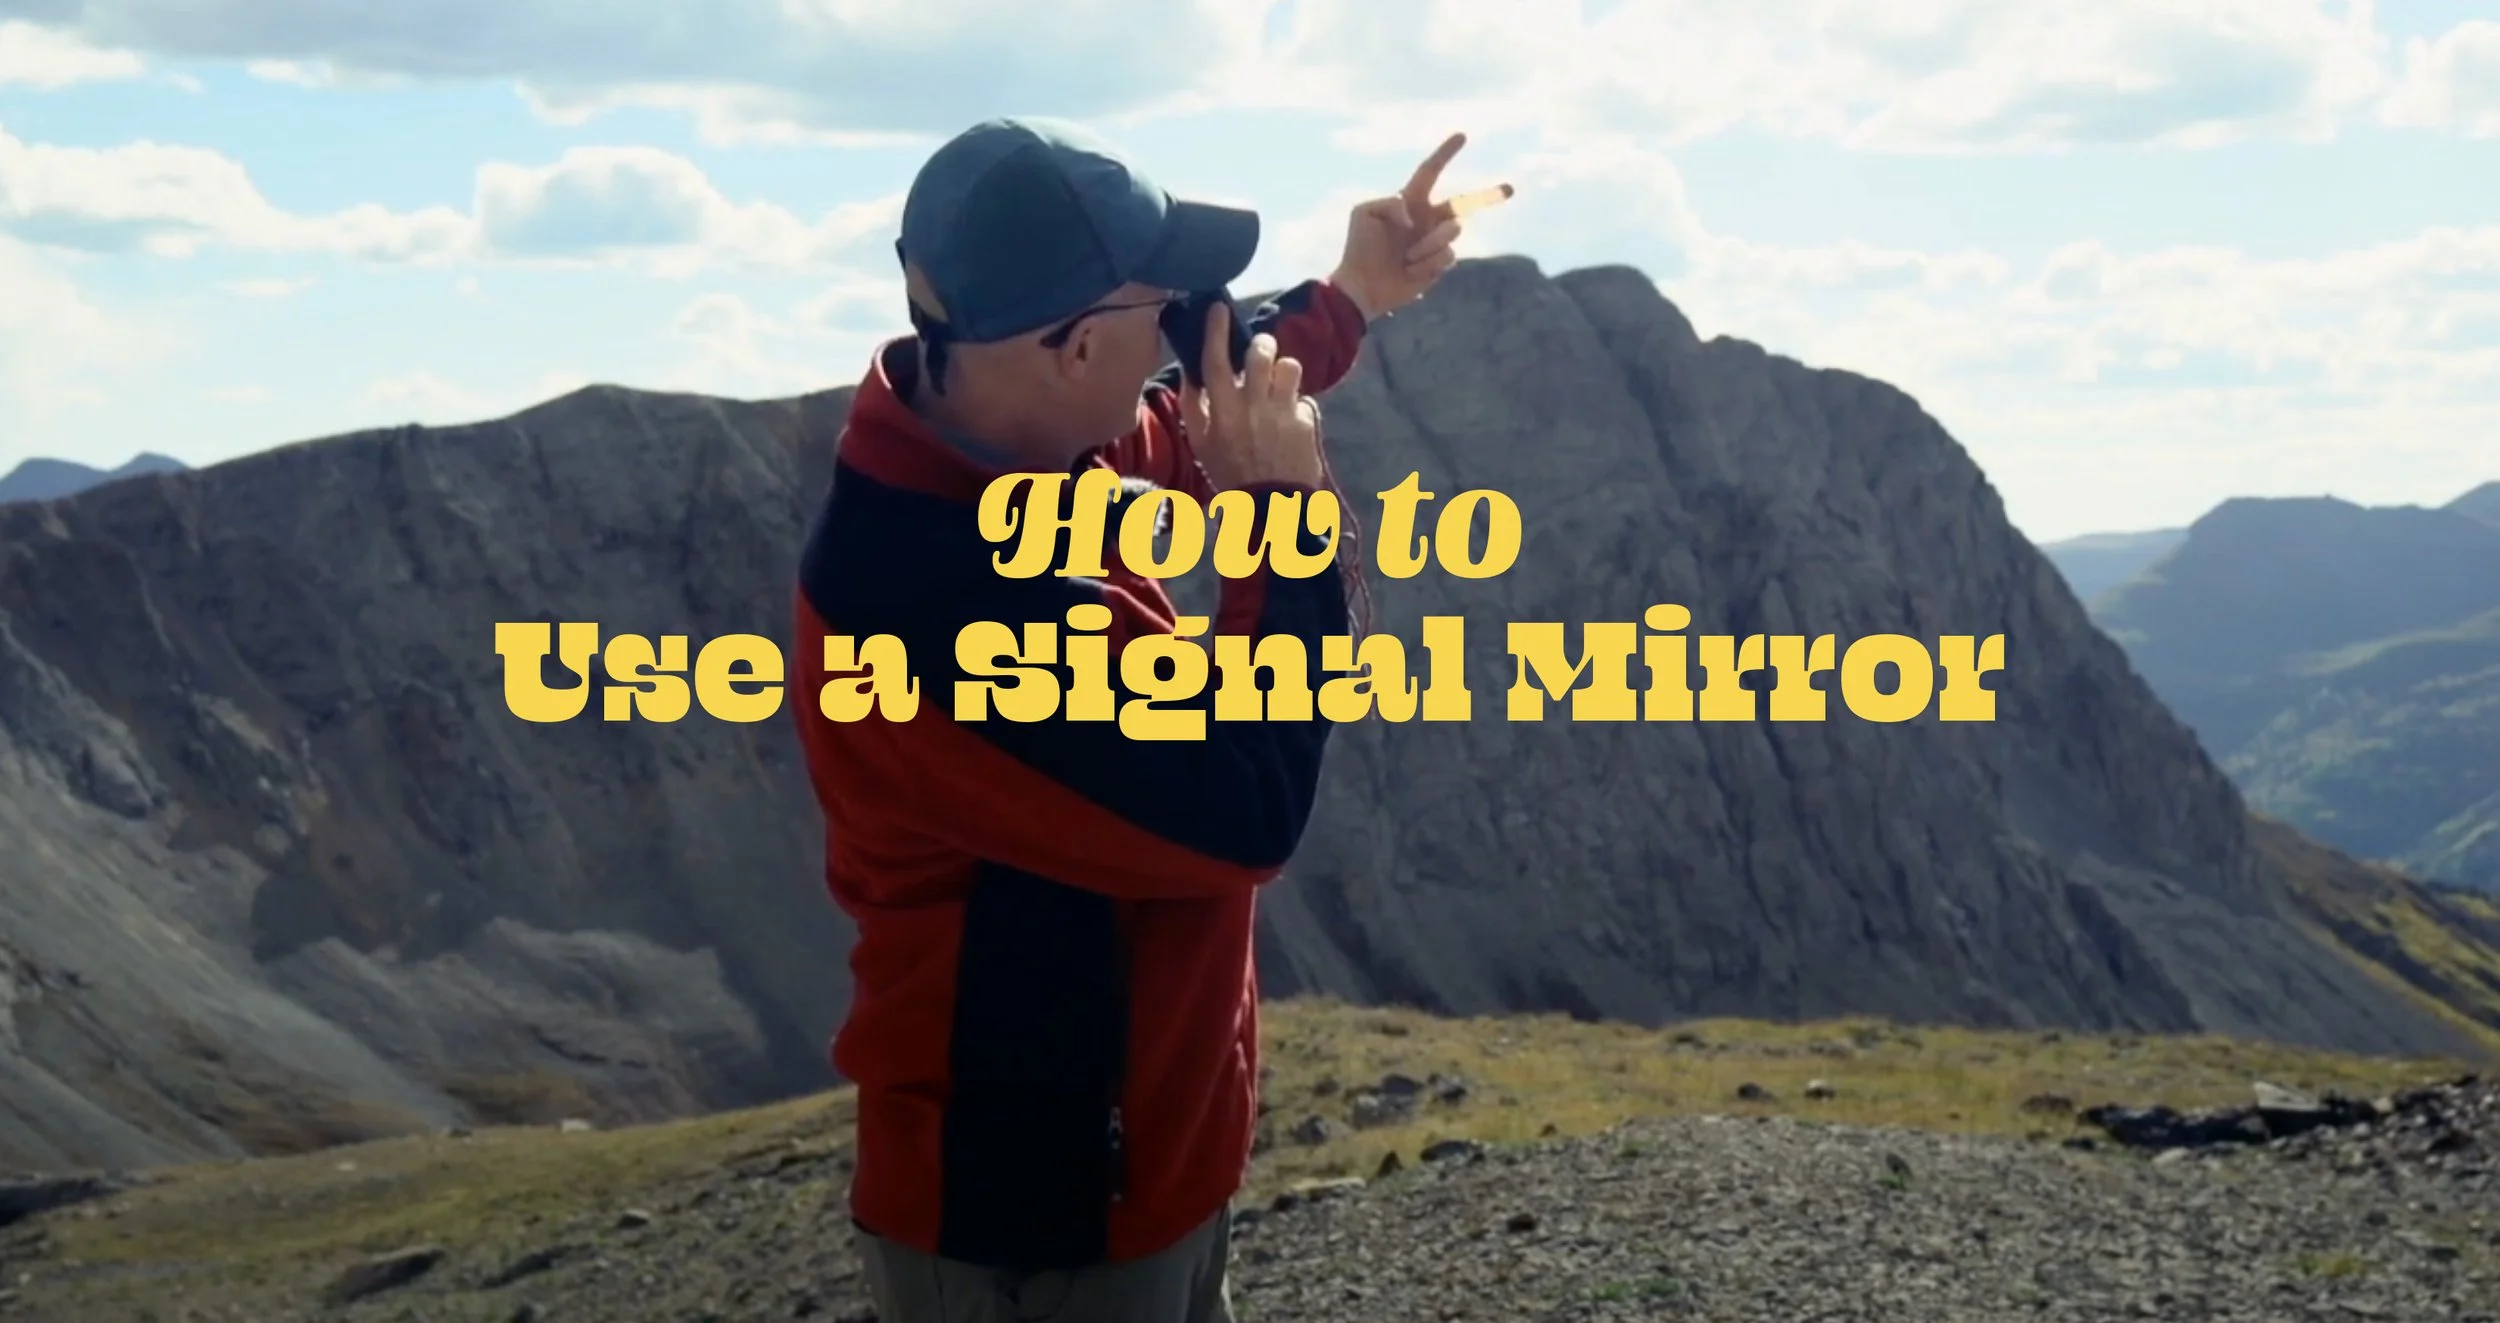
Demonstrate how to use a signal mirror.
Requirement 7(c)
Describe from memory five ground-to-air signals and tell what they mean.
Ground to air signals are used to attract the attention of rescue planes and helicopters. Sometimes even private or commercial planes will spot them. Make them as big as you can, about 13 to 20 feet tall. You can turn over dirt, use logs, rocks, or tree boughs, trample grass—anything that contrasts with the natural environment. Ground to air signals obviously require open spaces and should be close to your camp. Which five do you think are the most important to know for the kinds of outings we embark on?


Need Medical Supplies
Need Map and Compass
Injury/Need Medic


Yes/Affirmative
No/Negative
Need Signal Light


Not Understood
Tell us where to go
All is Well


Unable to proceed
Going this way
Safe to Land Here
A mini roll of duct tape weighs alsomost nothing and takes up little space. It has countless repair and first aid functions
$5 from REI